Instructions for Essentials customers
- Introduction
- Acquisition of hardware and software
- Installing and setting up Data Collection Management (DCM)
- Administration of the CIO Cockpit
Introduction
Welcome to the CIO Cockpit, the tool that supports IT managers with relevant KPIs and key figures for hardware and software in their IT environment. Predefined report templates, cross-manufacturer and cross-system check-ups as well as the compatibility with systems from market-leading manufacturers ensure greater transparency and support you as an IT decision-maker. This manual will guide you through the integration of your hardware and software into the CIO Cockpit.
Structure
The CIO Cockpit consists of two main components: the front-end and the Data Collection Management (DCM). The front-end is used to collect and display usage and inventory data for the individual hardware and software components. The DCM allows you to set up and configure the required data collectors, which enable you to collect data from the individual hardware and software components via their interfaces.
Terms
- Assets
- in the CIO Cockpit are hardware and software components and associated licenses. Each asset has a unique "system key".
- Organization-Units (OUs)
- are synonyms for a company name etc. and are displayed within the CIO Cockpit in an organization tree to represent the company structure (e.g. parent company, subsidiaries, various branches etc.). Each OU has an OU key.
- Organization Unit Key (OU-Key)
- is the unique ID of an OU within the CIO Cockpit. As a customer, you can make this available to your partners and/or distributors so that they can enter hardware and software for you, or identify yourself for hardware and software that has been entered by you.
- Usage data
- stands for performance KPIs such as utilization data, usage times and downtimes of hardware and software components.
- Inventory data
- stands for configuration data from the various hardware and software components, such as the number of CPUs, installed RAM and available memory capacities.
Procedure
The integration of the CIO Cockpit consists of three steps.
- Registration as a customer in the CIO Cockpit
- Registration of hardware and software in the CIO Cockpit
- Installing the Data Collection Management and setting up the data collection
Acquisition of hardware and software
Hardware and software can only be created by administrators of an OU within the same OU.
- Log in to the CIO Cockpit at https://app.ciocockpit.net
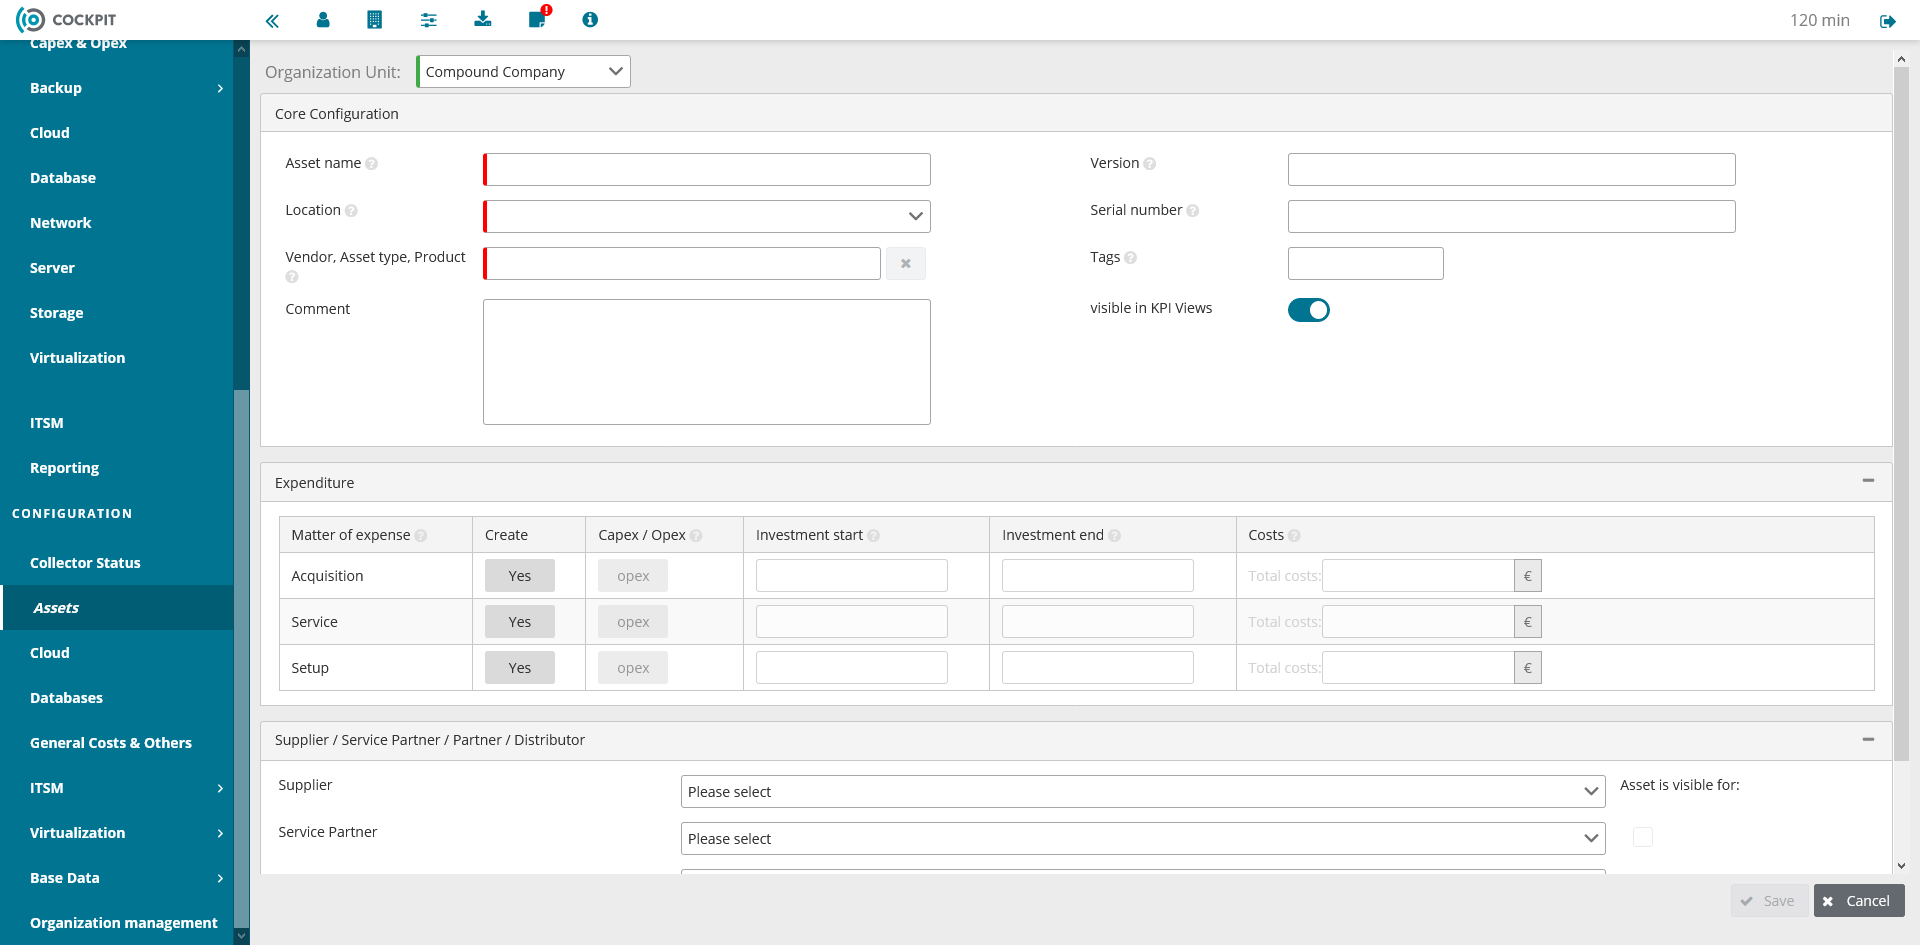
- In the menu under „Konfiguration > Assets > Button [+ Add]“ the asset form can be opened:
-
Mandatory data
- Organization unit (admin rights required in the OU)
- Asset name
- Asset type
- Product
- Vendor
- Location
-
Optional information
- Version
- Serial number
- Comment
- Tags
- Hardware and software costs for acquisition/service or setup (subdivision CAPEX/OPEX)
- Selecting the Partner/Service Partner and Distributor
Note: The selection is only possible after the partner/service partner or distributor has identified the hardware and software asset. (See the description in chapter Release of hardware and software data to a Partner) - Release of hardware and software information via hardware and software visibility settings for Partner/service partners and distributors Note: The release of hardware and software information is described in more detail in chapter Release of hardware and software data to a Partner.
-
Visibility
Inactive or irrelevant assets can be excluded from the essentials views "Backup Device", "Backup Software", "Server", "Network" and "Storage" by deactivating the setting "visible in KPI views".
Excluded assets will not appear in the KPI views and not be added to any counters or overviews.
This setting is available both in the asset form and directly in the asset list table. Just like all table columns it can be hidden with the column selection.
-
Mandatory data
Creating Assets via the Product Selection
The CIO Cockpit provides guided support for the user when manually creating assets. With the help of a selection tree the user can define the manufacturer, the asset type and the product / product category.
Further information can be entered during the creation process, e.g. the version, serial number or tags. It should be noted that the Data Collection may overwrite these fields for some assets. Please refer to the Datacollector Information Sheets for details on the assets we support and further information.
Default selection
The CIO Cockpit provides predefined selections for assets, if a data collector is available for them.
Individual selection
The predefined asset selections can be edited in the Configuration > Base Data > Manufacturer & Products area. This view allows you to activate or deactivate individual products as well as manufacturers. Deactivated products and manufacturers are no longer available for selection in the asset registration form. Moreover, new manufacturers can be created with their products. Existing manufacturers can be complemented with additional products.
Comments on the default / individual selection
The default or individual selection is used to create assets and make changes regarding manufacturer, asset type and product / product category from a defined quantity.
In summary, this means for assets in the CIO Cockpit:
- The selection is not relevant for the lifecycle of assets in the CIO Cockpit.
- The system's selection options are adjusted over time, but have no influence on existing assets.
- Products that are not available in the system can be added as required using the individual selection.
Installing and setting up Data Collection Management (DCM)
To obtain usage or inventory data on hardware and software, the data collection management system must first be installed by the customer and the configuration for collecting the required data must be set up. For this purpose, an OVA package is provided, which contains the data collection management. After the installation, the DCM can be started via the browser. In the following, the prerequisites and process details are described. This chapter includes the integration of all data collectors.
System Requirements for the Data Collection
- VMvSphere Client (when installing the Data Collection-VM in VMWare vCenter)
- 4 vCPUs
- 6 GB RAM
- 25 GB HDD
Installation of Data Collection-VM in VMWare vCenter
- Download of Data Collection VM (OVA format) at CIO Cockpit Resources (File size approx. 500 MB)
- Start vSphere Client for Deployment of Data Collection VM
- Menue “File > provide OVF template”
- Make VM configuration
- Start Data Collection VM
- The DCM can only be executed in the browser
- URL has format: https://:8443
- User name “admin”
- Password “admin” (The password can be changed later - as described in the chapter Administration of users for the DCM
Note: Please note that the DCM's SSL encryption is an SSL certificate not signed by an official authority and that your browser will display a warning, i.e. you must explicitly trust the certificate/page.
Firewall configuration matrix for the Data Collection VM
Global Firewall Requirements
| Source | Destination | Port (default) | Protocol | Direction | Comment |
|---|---|---|---|---|---|
| All VMs | DNS-Server | 53 | TCP, UDP | both | DNS name resolution |
| All VMs | NTP-Server | 123 | UDP | both | Time synchronization |
| All VMs | https://collection.ciocockpit.net | 443 | TCP | outbound | Data collection backend |
| All VMs | https://api.ciocockpit.net | 443 | TCP | outbound | Data collection backend |
| All VMs | https://auth.ciocockpit.net | 443 | TCP | outbound | Authorization server |
| All VMs | Administrative Network | 8443 | TCP | inbound | configuration |
| data-collection-vm | http://*.debian.org | 80 | TCP | outbound | Update operating system |
| data-collection-vm | *.cloudsmith.io | 443 | TCP | outbound | CIO Cockpit data collector updates |
Specific Firewall Requirements
In addition to the globally required port approvals, additional port approvals are required depending on which assets are to be included in the DCM. Information about required port releases is available in the Datacollector Information Sheets
Administration of the DCM
„Quick Start“ Configuration Wizard
The "Quick Start" wizard guides you through a four-step process for each hardware and software to be connected, whereby the first step only needs to be carried out when using the wizard for the first time.
Step 1: Global Configuration
In this area you can set the environment of the CIO Cockpit. This step is only performed once.
If you do not have an on-premise installation of the CIO Cockpit, you can skip the environment configuration with "Save & Next" and go to the next step, provided the "Use Cloud" setting is activated.
If you have an on-premise installation, please enter the URLs for the data collection (DC), the Oauth server and the core server.
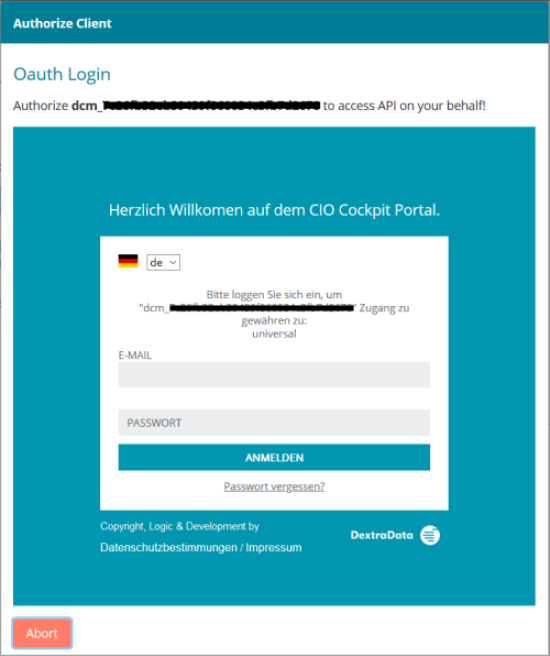
Step 2: Core-Login
The core login is used to authorize data collection management to the CIO Cockpit backend. This is required for the configuration.
Via "Authenticate Client" the login mask for the CIO Cockpit Cloud opens, in which you enter your normal CIO Cockpit login with e-mail address and password. Click on "LOGIN" to carry out the authorization.
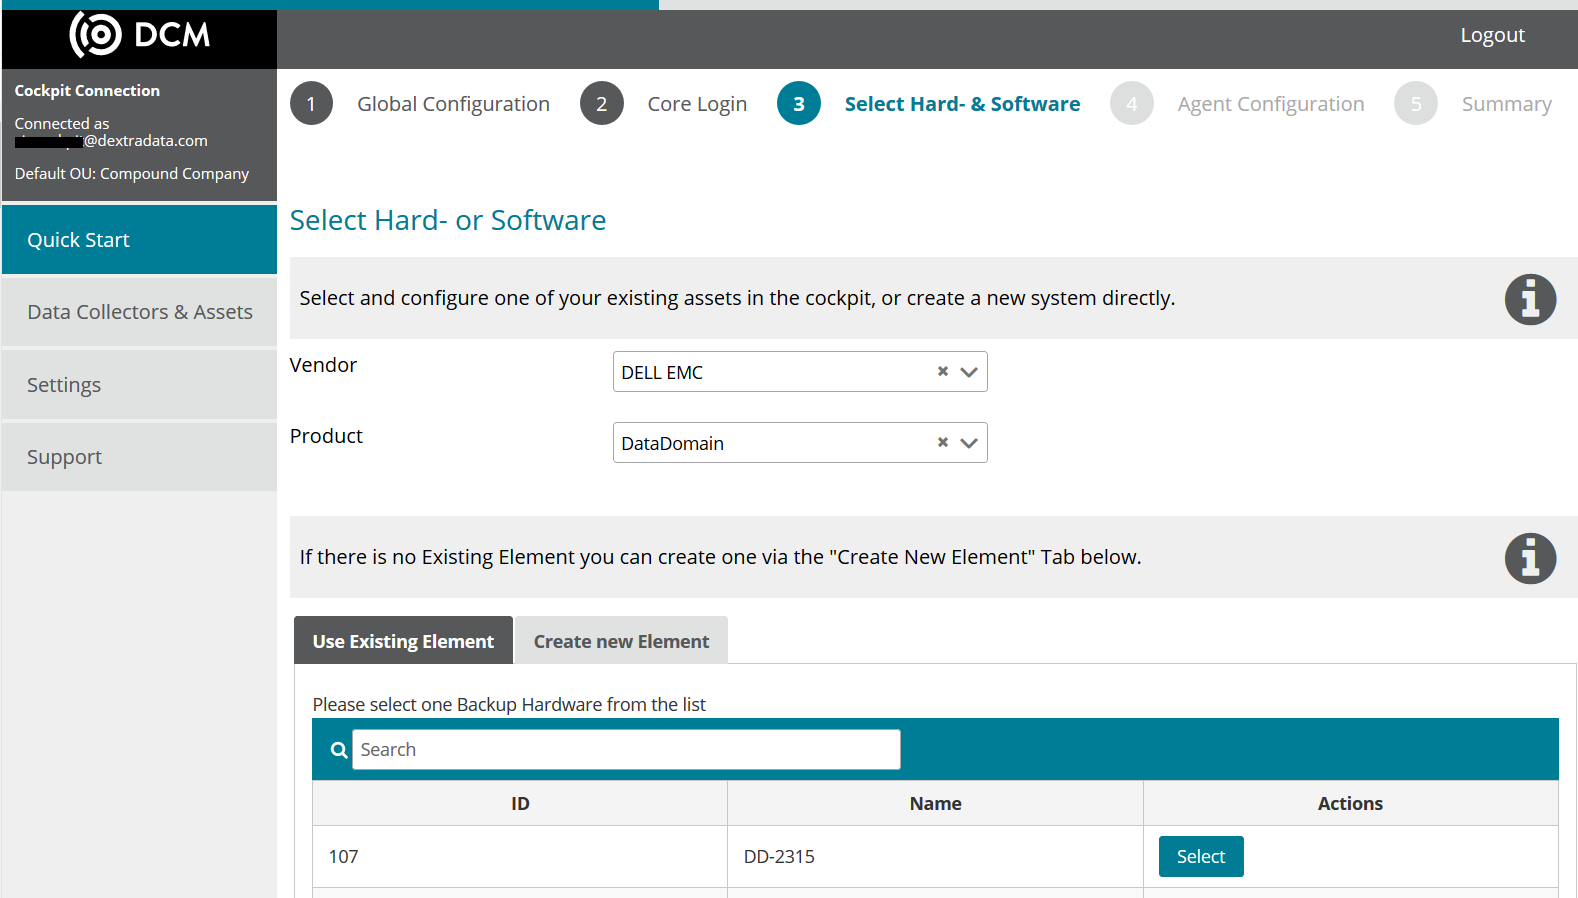
Step 3: Select Hard- & Software
In this step you configure your assets. Select a vendor from the drop-down list and then select the product from the product list. Once a selection has been made, an asset previously created in the CIO Cockpit can be selected for the selected vendor/product combination or a new item can be created.
Step 4: Configuration of the data collector
The next step configures the data collector for the previously selected product and therefore requires the relevant information. The required entries depend on the selected system. Detailed information can be found in the documentation area "Data Collector Information Sheets". In most cases, the following fields are required:
- URL, FQDN, or IP for the asset
- Port for communication with the system (the default port is displayed as ghost text)
- User name and password of the service user of the hardware or software product
The user name and password are encrypted and stored only locally. There is no reconciliation with the CIO Cockpit cloud backend.
You can optionally add a comment. When you confirm with "Save", the data collector settings for the system are saved.
Step 5: Summary
The data collector is now set up for the specific system. The usage and inventory data for the configured asset is stored in the CIO Cockpit. Further configurations for other assets can be created in the same way.
Administration of users for the DCM
The users of the DCM can be managed under the menu "Settings > User". Here the DCM admin password can be changed (recommended) or - if necessary - additional users can be created.
Global Data Collector Settings
The Quick Start Assistant allows you to configure the environment of the CIO Cockpit. If the environment changes, it can be adjusted again in the menu "Settings > Global Data Collector Settings". The required fields are:
- URL for the DC API (Data collection API)
- URL of the OAuth server
- URL of the Core API Server
If "Use Cloud" is selected, these fields are filled in automatically.
Administration of the CIO Cockpit
Administration of the CIO Cockpit users
In the CIO Cockpit, users can be invited, activated or removed. Only registered users are authorized to view information in the CIO Cockpit. For all the following actions, you must successfully log in to the CIO Cockpit at https://app.ciocockpit.net.
Inviting additional users
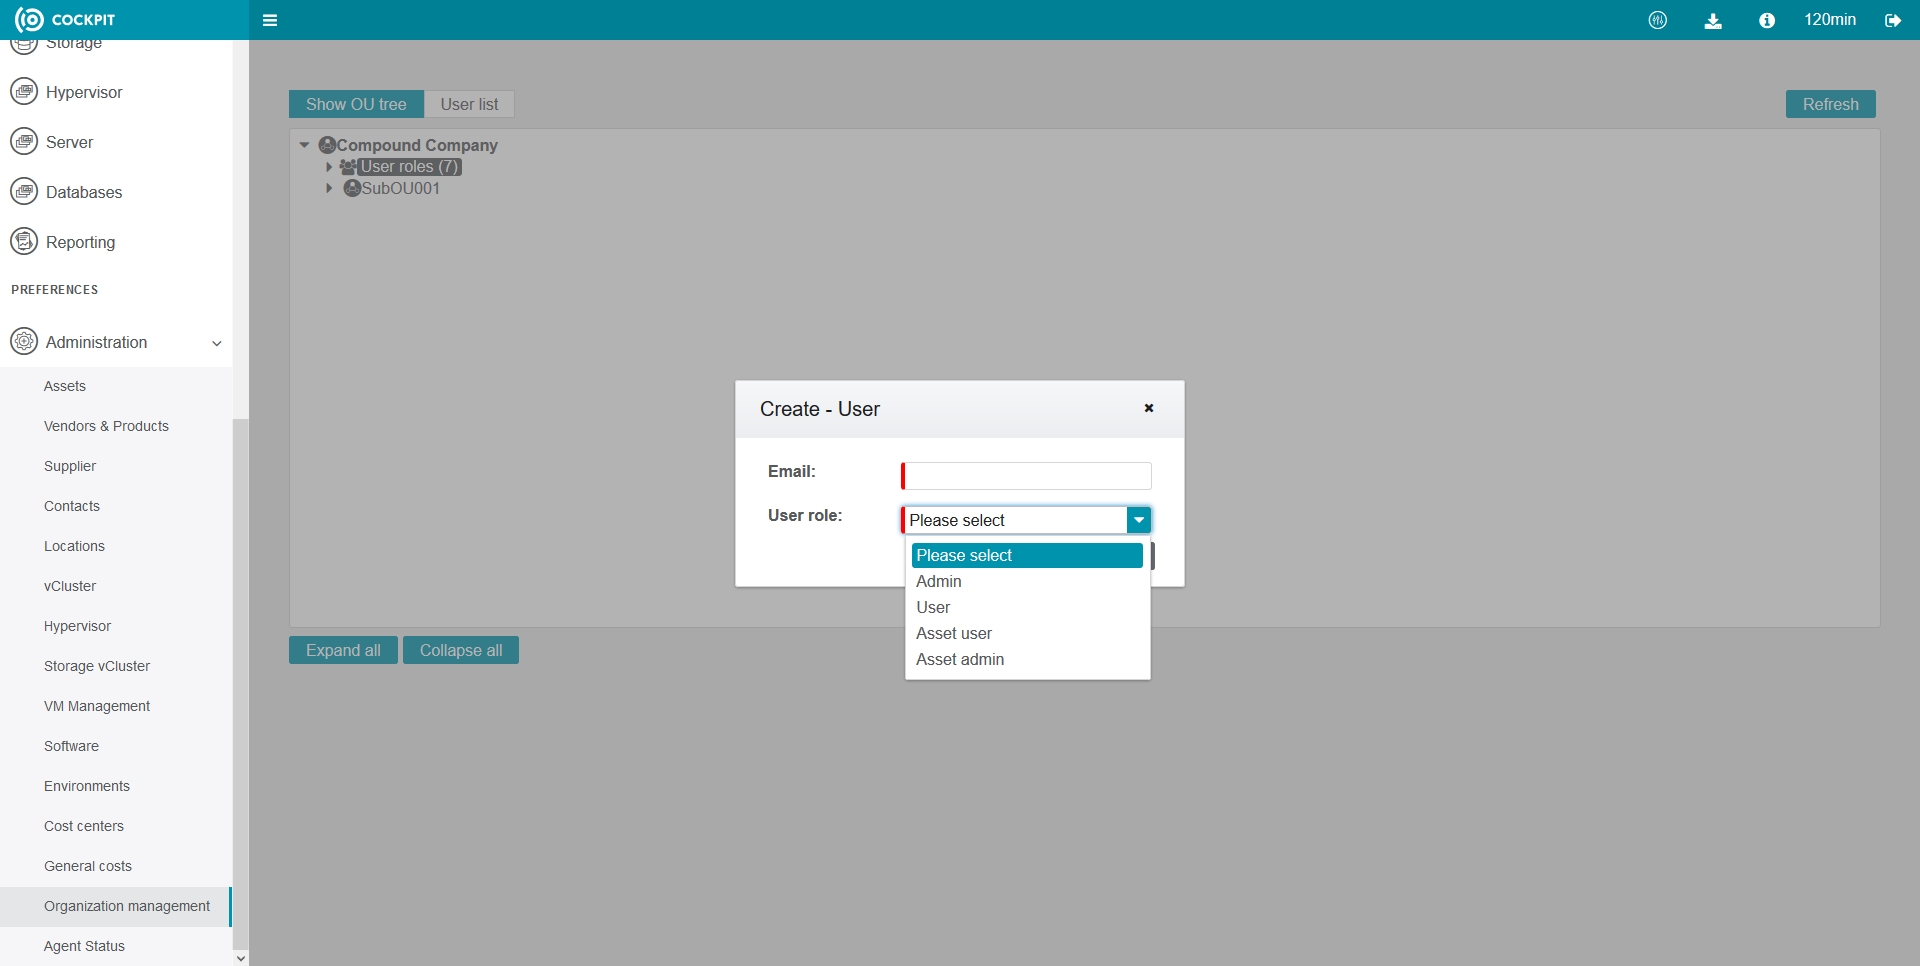
Additional users can be invited to an OU. The function can be found in the menu under Configuration > Organizational Management. The OU tree (with sub-OUs if available) and the user roles are displayed. To invite users, right-click on the respective "User Roles" OU and select "Create". A form will open:
- Enter the e-mail address of the user to be invited. It will be the user name.
- Set the user role for this user (administrator or simple user with read-only rights)
The process is similar to the normal registration in the CIO Cockpit:
- The user receives an invitation e-mail with a link to the activation page
- The user sets the password for their login
- After successfully setting the password, an e-mail confirmation with a link to the CIO Cockpit follows and the registration is completed
- The user can now log on to https://app.ciocockpit.net with his selected login information
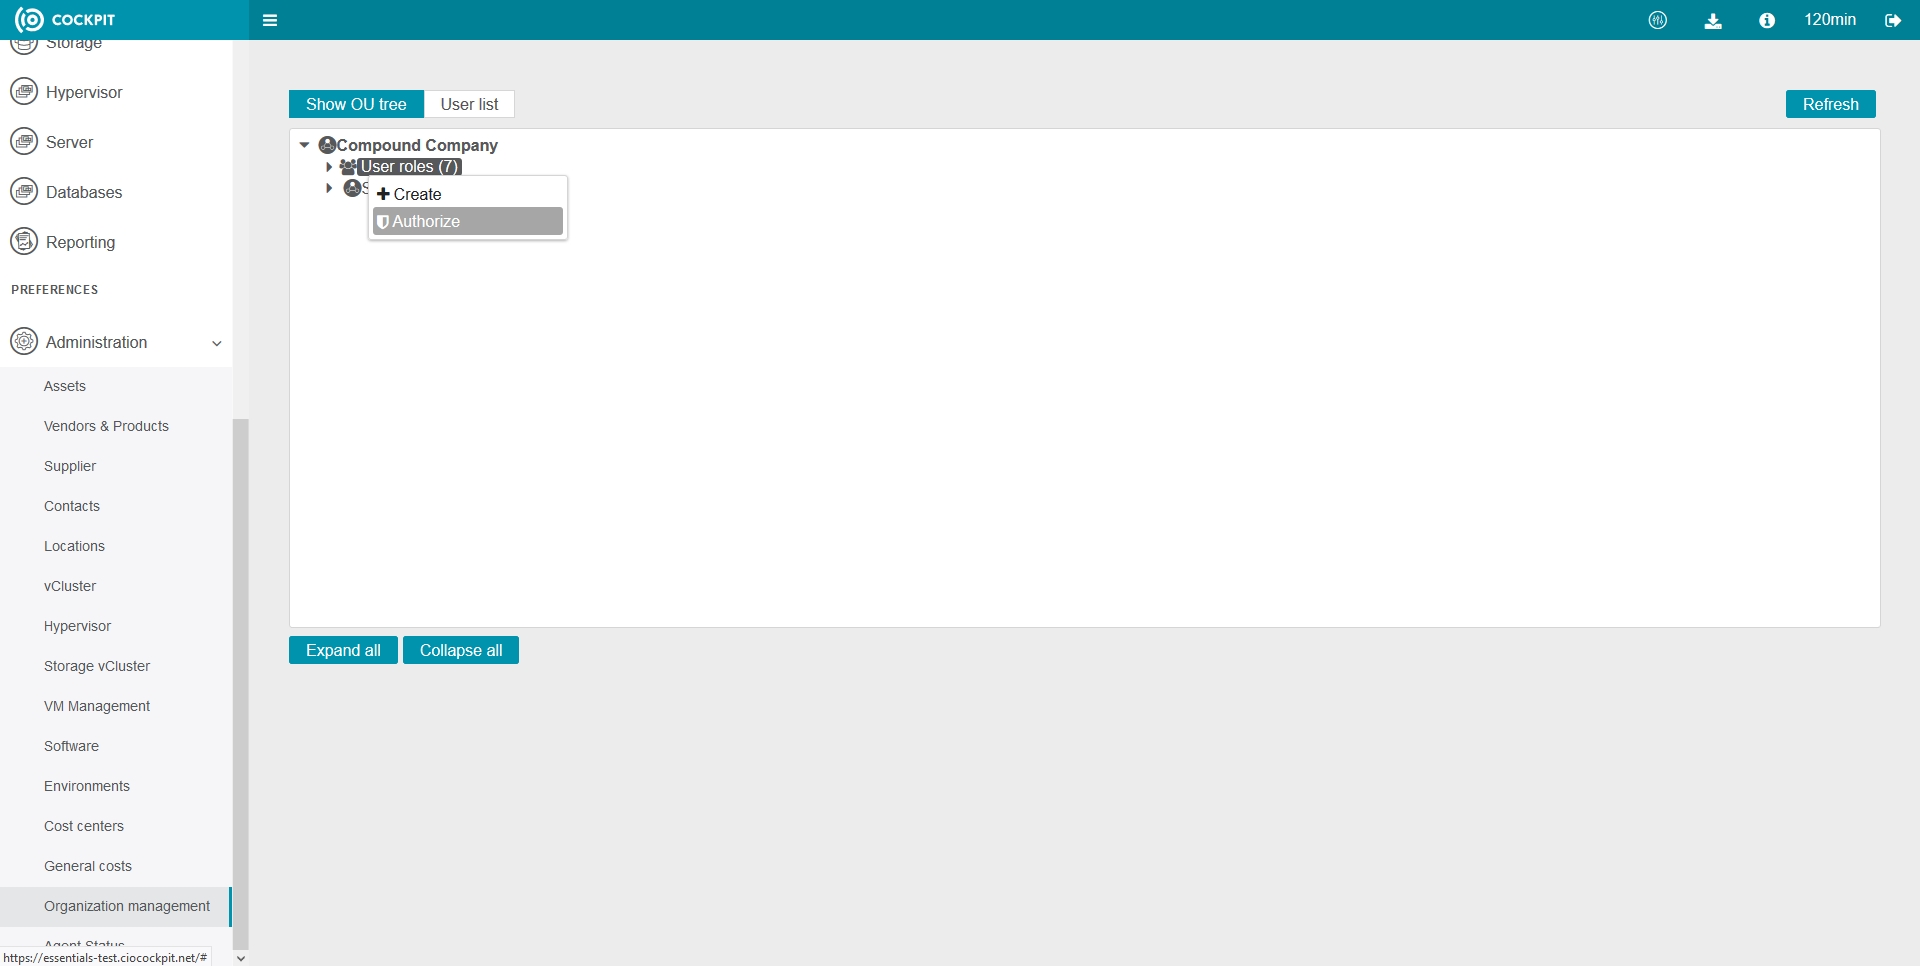
Authorization and assignment of further users to an OU
The user role assigned to a user during the invitation can be adjusted afterwards. If a user should be able to perform administrative actions, they can be assigned the administrator role. To do this, select the menu item Configuration > Organizational Management:
- Right-click on the "User roles" of the respective OU and select "Authorize" in the context menu
- Select the user from the list (user does not yet appear in the OU under user roles)
- Assign the appropriate user role (administrator, user, etc.)
The user role can also be changed directly on existing users. To do this, simply right-click on the respective user under "User roles" and select "Edit". The new user role can be selected and saved for the user.
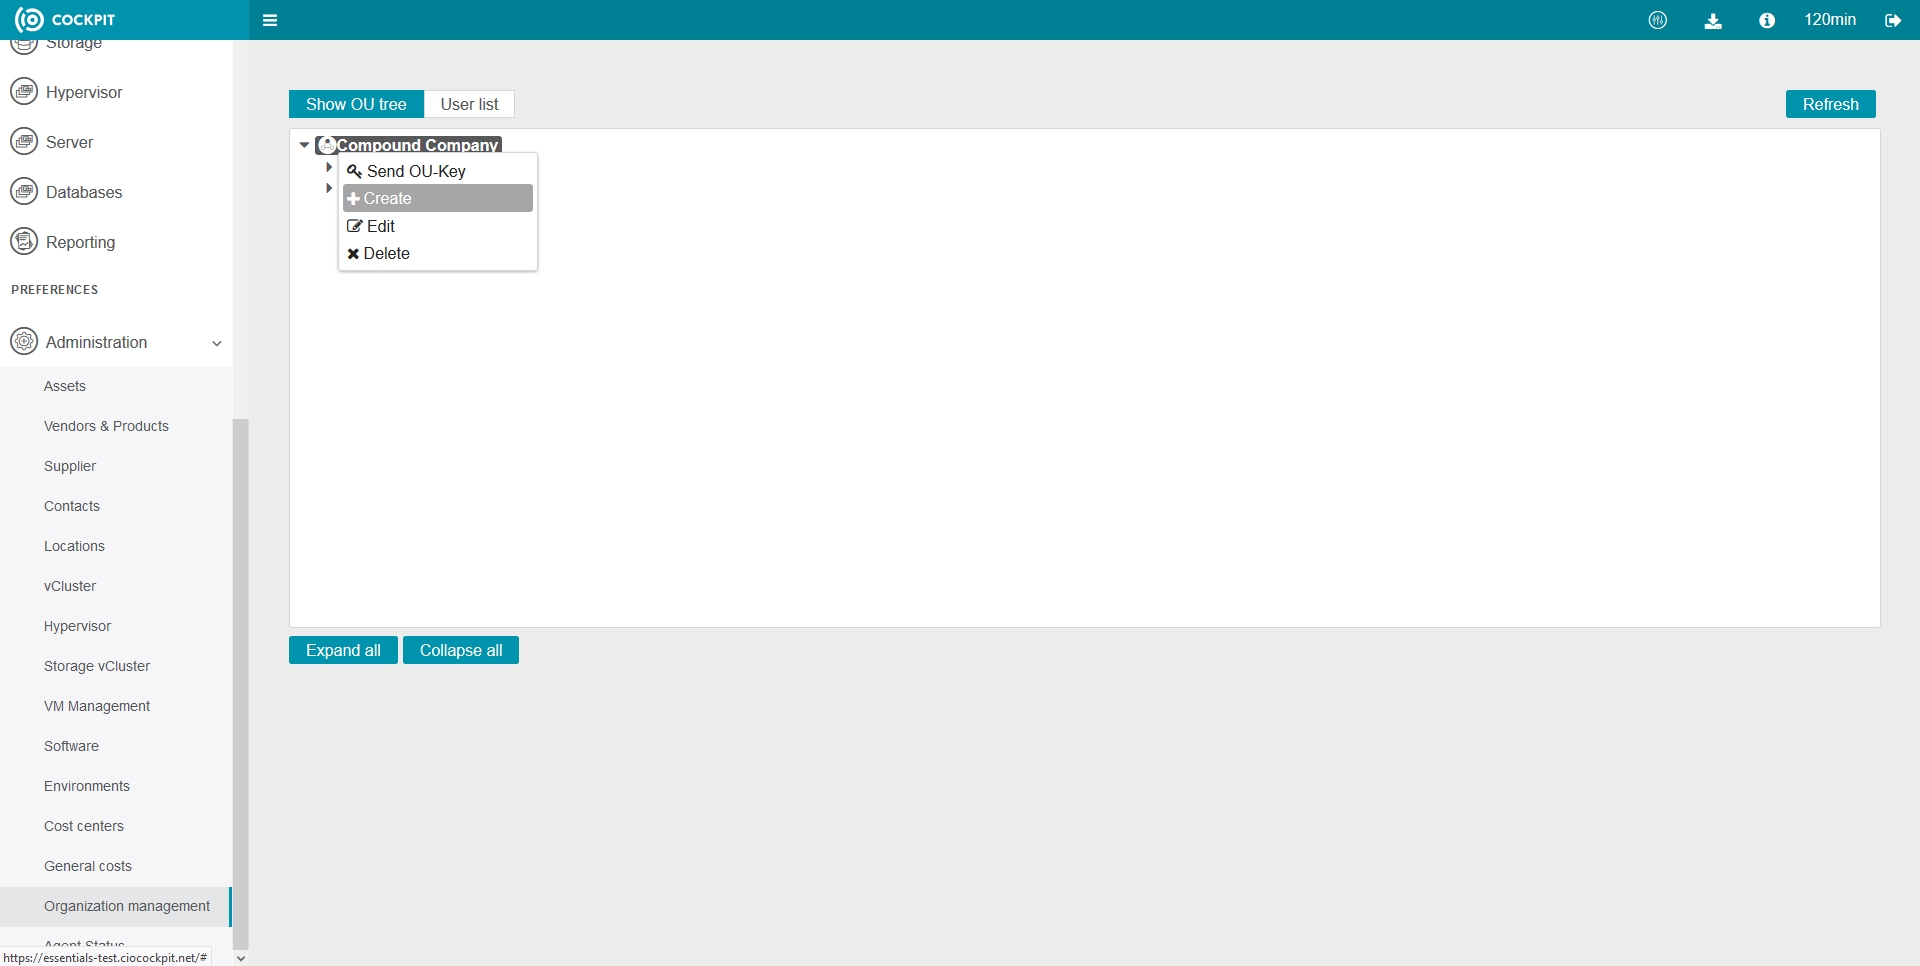
Creation of further organizational units
When you register as a customer for the first time, the company name is determined, which then becomes the name of the main OU. Sub-OUs can be created under any OU, which helps e.g. to organize further users. To do this, select the menu item Configuration > Organization Management.
- Right-click on the OU name and select "Create" in the context menu
- Enter the name of the new OU in the form and confirm with "Create”
Hardware and Software Administration
The customer view of the hardware and software
In the CIO Cockpit the created assets (hardware and software components) can be displayed and managed in an overview. The functions can be found under Configuration > Assets.
![Figure: Administration - Administrating assets/cc/img/kunde-administration-assets.jpg]
Release of hardware and software data to a partner
There are several ways to share hardware and software information with a partner. One of them is to share individual hardware or software components. The other option allows the release of all hardware and software information of an OU using the OU key.
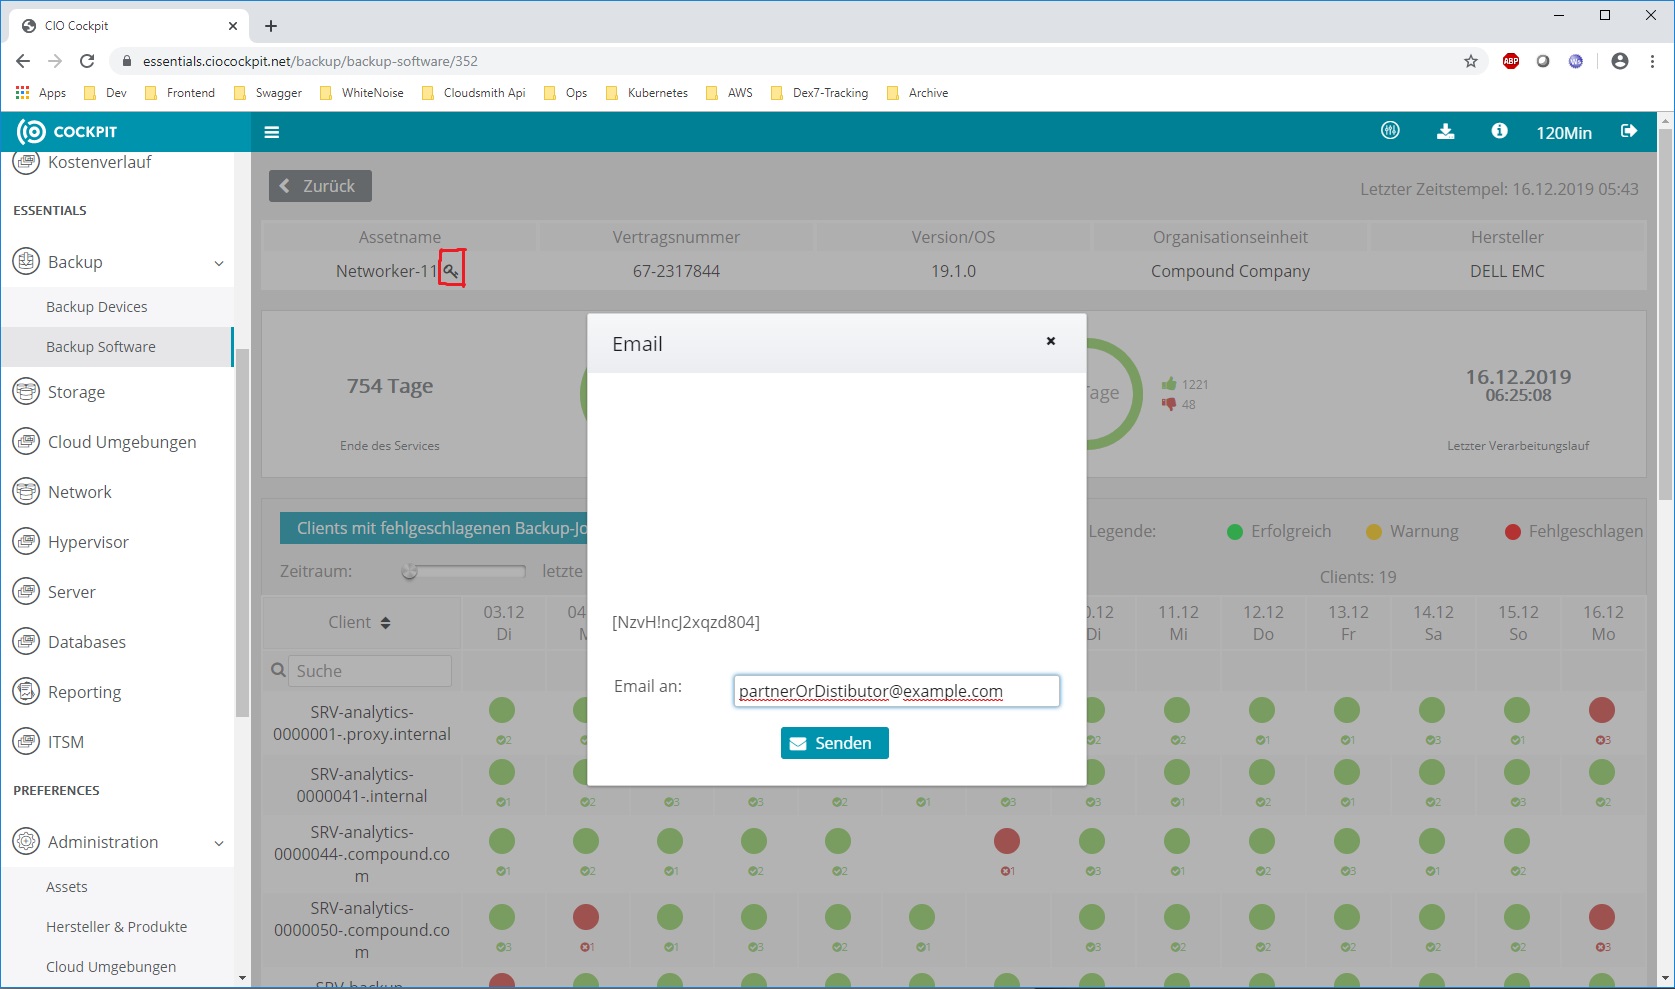
Release of specific hardware and software
A hardware or software can be assigned to a partner. The enabling through the system key allows them to view the KPIs of the system. The system key can be displayed in the detail view of a hardware or software component:
- Click on "Backup", "Storage" etc. in the menu on the left. A list of configured systems is displayed.
- Click on a list entry to open the detailed view of a hardware or software component (e.g. Dell EMC NetWorker)
- A key icon is displayed next to the asset name. A click opens a pop-up window with the system key.
- Enter the email address of your distributor or partner and send the system key via email to the selected recipient.
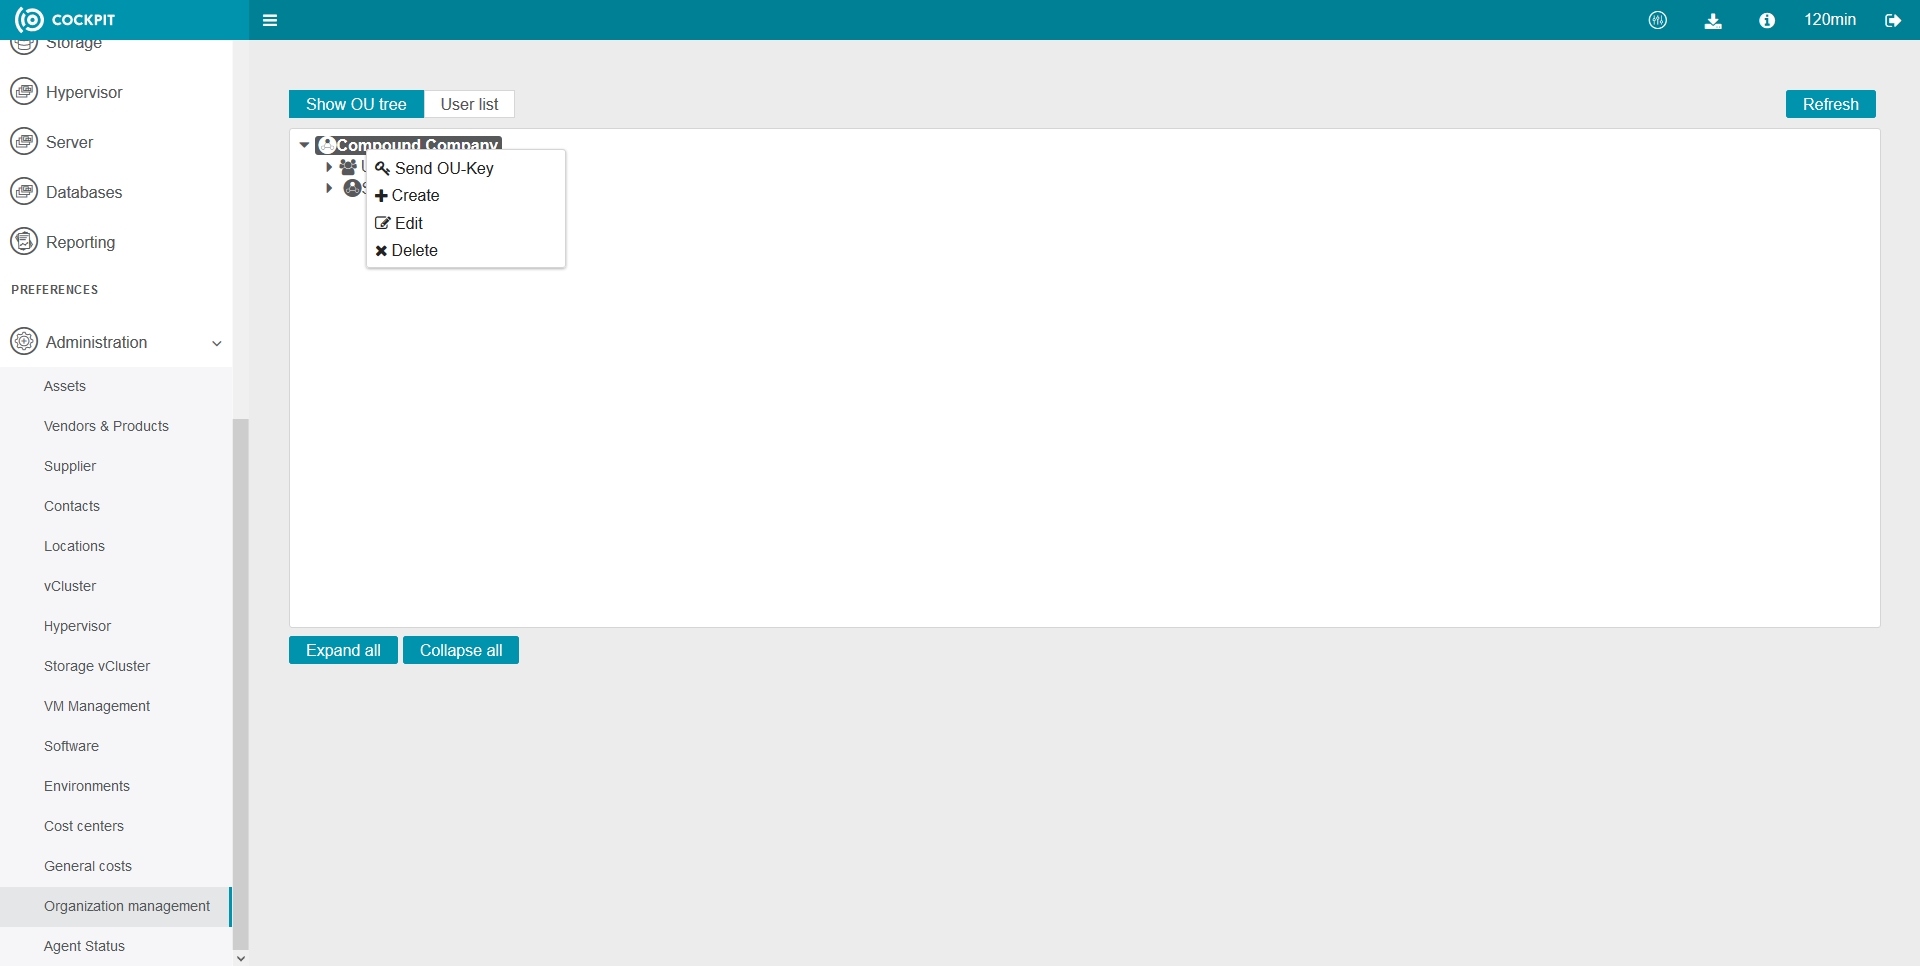
Provision of hardware and software information for suppliers or distributors
Another option of enabling hardware and software information is through using an OU key. This key can be sent to a partner or distributor, which also allows them to register additional hardware and software for your OU. To read or send the OU key:
- Open the menu item Configuration > Organization Management. The current OU tree is displayed.
- A right click on the company name or OU opens the context menu. Select "Send OU keys". A pop-up window with the OU key opens.
Note: In order to read or send OU keys you must have administrator rights of the respective OU.
- Enter the e-mail address of your distributor or partner and send the OU key via e-mail to the selected recipient.
Congratulations, you have completed the integration of your organization into the CIO Cockpit. You can now integrate additional hardware and software to keep an eye on your IT infrastructure. If you have any questions or suggestions, please call +49 201 959750 or send an e-mail to our support team at servicedesk@dextradata.com.