Asset Import / Export
- Introduction
- CSV import and CSV export
- Import assets into CIO Cockpit
- Export assets from CIO Cockpit
- Importable asset fields
Introduction
CIO Cockpit offers you different ways to manage your assets within the system:
- Manually capture and maintain assets in the Cockpit
- Capture assets in the DCM "Quick Start" Configuration Wizard
- Entry and maintenance via the CSV import and export functions
This tutorial explains how the interactive CSV import works.
CSV import and CSV export
The import and export interfaces for assets in CIO Cockpit are based on the CSV format. An import operation, as described below, is always based on exactly one CSV import file.
The file to be imported must be structured as follows:
- Individual entries (assets) are separated from each other by a line break (in Linux or Windows format).
- Individual columns within an entry are separated from each other by a semicolon (;).
- The first line in the CSV file contains the column names and is used for mapping, as described in Map CSV file.
- All rows must have the same number of columns.
- Empty columns of individual entries (assets) can be realized by not inserting any text between the two surrounding separators (;). This does not result in that the information is deleted when an existing asset is updated, but that the information is ignored.
- If a specific information of an entry is to be deleted, the following text must be set as entry in the CSV column:
#NULL#.
See the last section of this guide Importable Asset Fields for a complete list of asset fields,
for which you can provide information in your CSV input file.
Please note: It is not mandatory that you match the naming of the columns in your CSV file to the identifiers provided below.
However, we still recommend that you do so, if technically possible, as this will make the rest of the import process more convenient and quicker for you to perform.
Import assets into CIO Cockpit
The interactive asset import process can be started from the configuration area - "Assets" section. To do so, click on the "CSV Import" button. The following sections explain step by step how to use the import function, starting from the view that opens after the click.

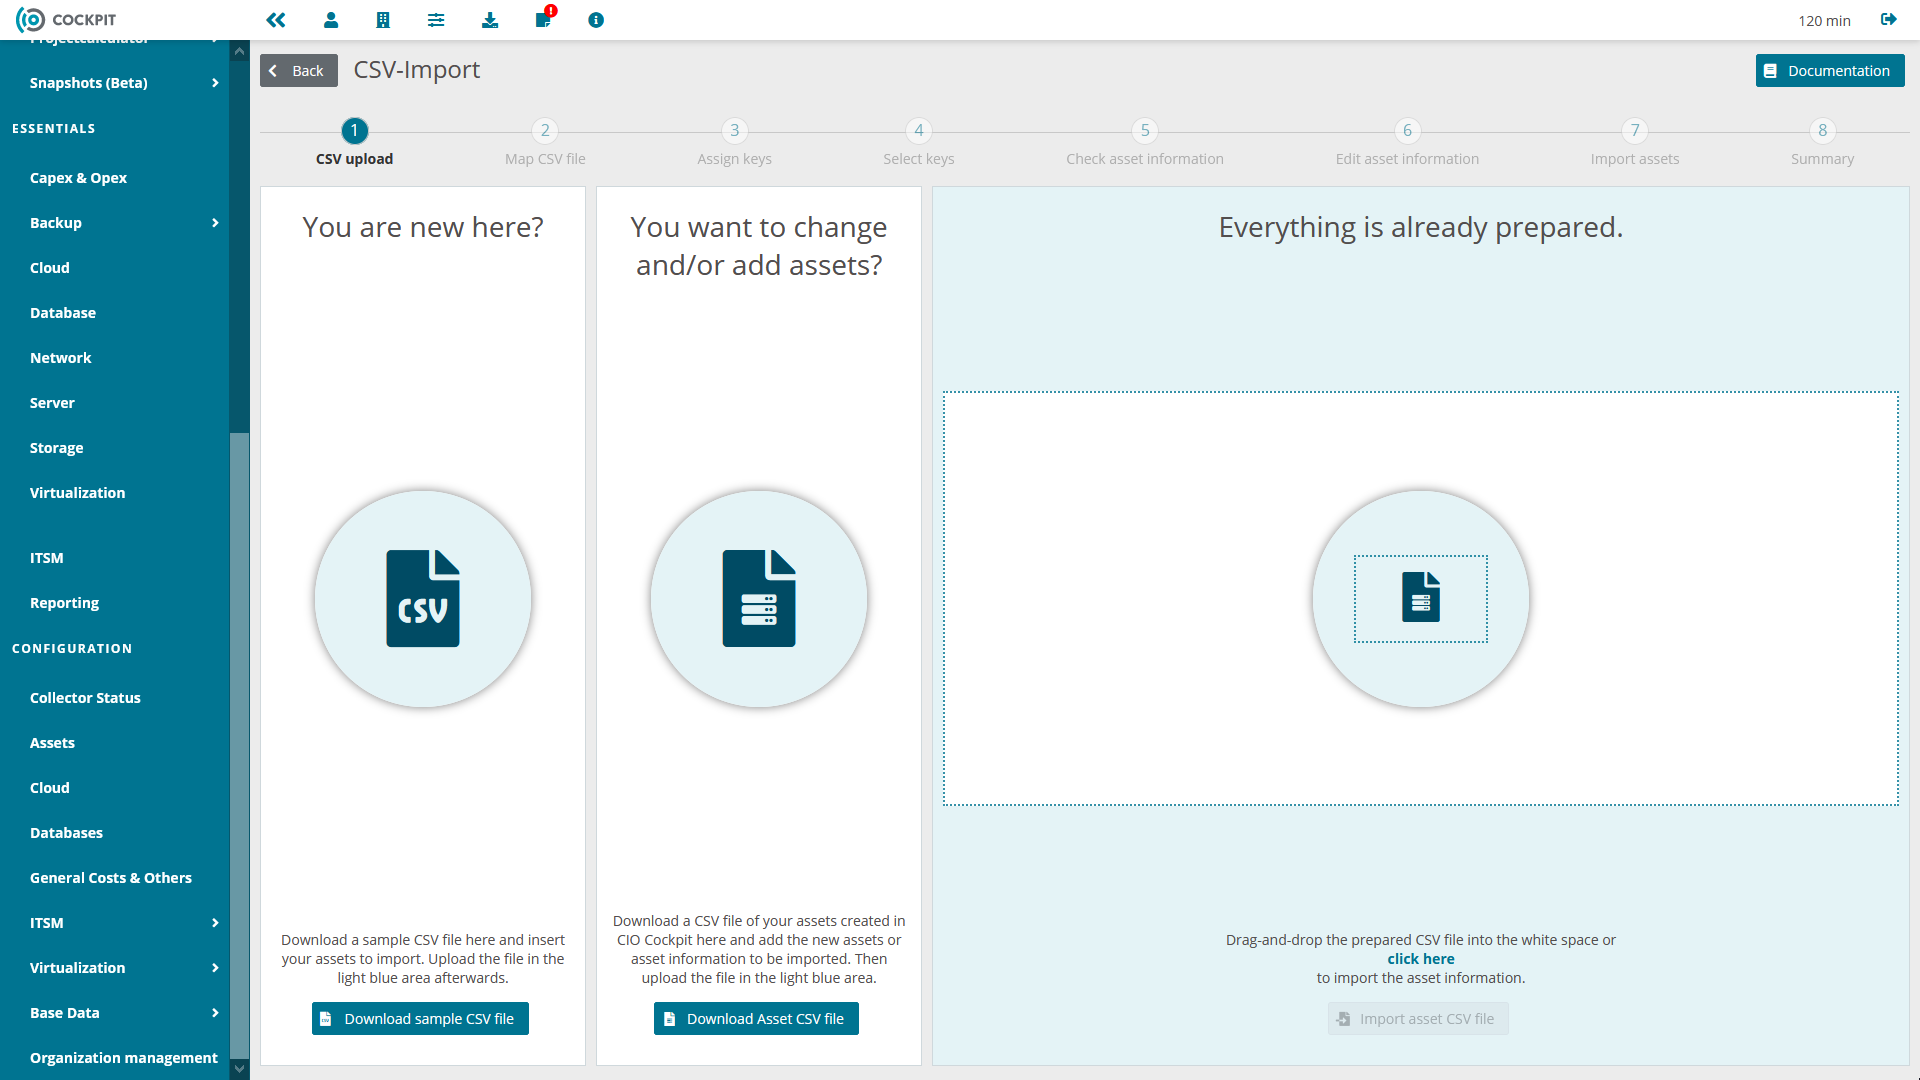
Step 1: CSV upload
In the first step of the import process, you must provide an input for processing in the form of a compatible CSV file (see CSV import and CSV export).
There are several ways to do this:
-
using the "Download sample CSV file" button, you have the option to download a sample tailored to your CIO Cockpit environment, by illustrating which information is needed in which format to import assets into CIO Cockpit.
The sample CSV file contains all asset fields available for import and can be used as a template for your own import file:
The first line of the sample file contains the default column identifiers.
The second line explains the column contents and the format to be used in each case.
The third line contains example values for each column.
Alternatively, you can download the sample file here. -
via the button "Download Asset-CSV-File" you have the possibility, to generate a complete export of your assets stored in CIO Cockpit and download it as a CSV file. This file meets the requirements for an input for the import function.
You can modify the generated export file and use it for import afterwards. This is especially useful for updating existing assets (e.g., adjusting maintenance costs), However, you can also add additional assets to the same file, which can then be regenerated using the import function. -
using the drag and drop area on the far right, you can upload a prepared CSV import file as input for the import and make it available for processing. This action starts the preparations for import, while the first two options are for preparing the input. Drag a CSV file to the drag and drop area or alternatively click the dark blue button to open a file selection dialog. After selecting a file, click the "Import Asset CSV File" button to proceed to the next step.
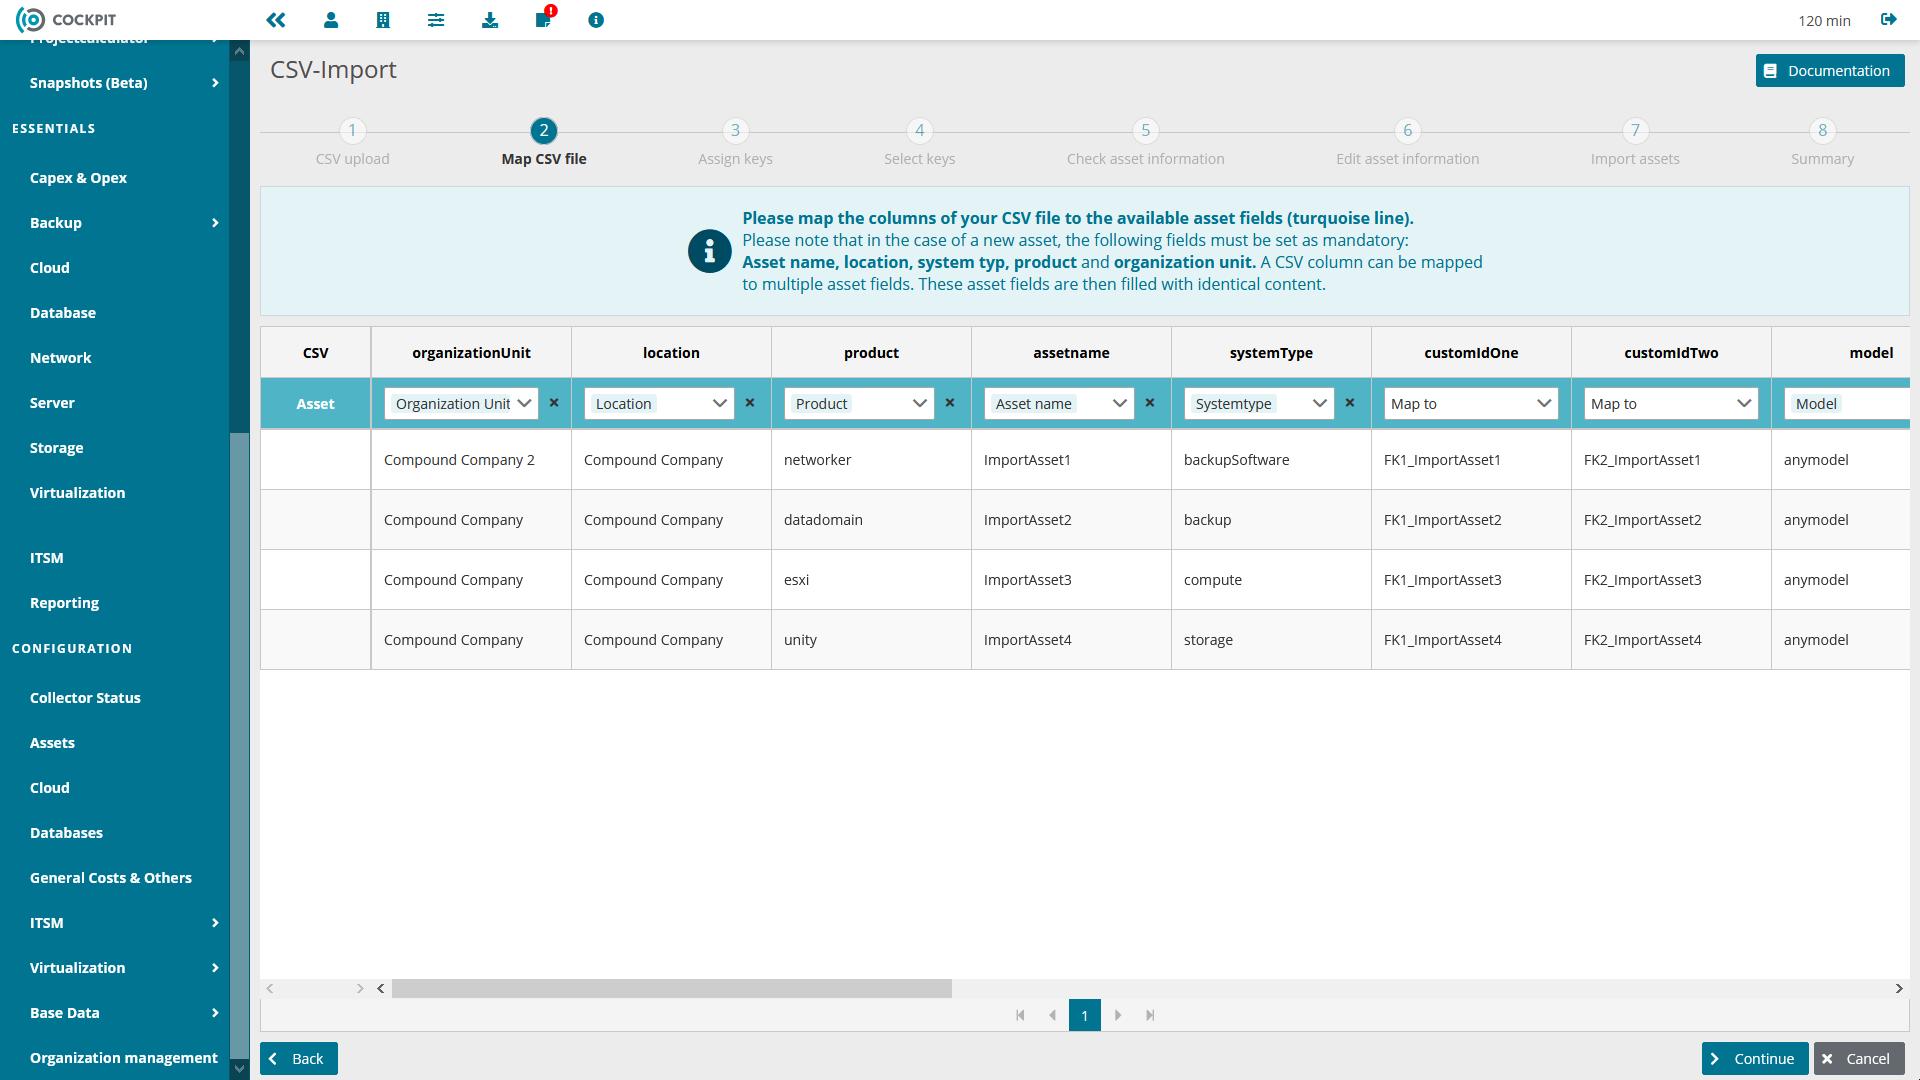
Step 2: Map CSV file
The second step is to create a link between the columns defined in your CSV file and the asset fields available for import.
The software will first automatically try to find suitable mappings and enter them as suggestions.
If you take the names of your CSV columns from the sample file or an asset export, all columns can be selected automatically.
You have the option to map each of your CSV columns to any number of asset fields.
This copies the values of a single CSV column to multiple asset fields.
Each asset field, however, can only be mapped by a maximum of one CSV column.
In the upper, gray row of the table you can see all columns of the CSV file.
In the blue row below, you will see a drop-down menu for each CSV column with the asset fields that are still available (i.e. not yet occupied).
If you select an entry from the drop-down menu, the corresponding asset field will be filled with the information from the CSV column in the subsequent import.
The entries in the table correspond to the data in the uploaded CSV file.
It is not necessary to fill all asset fields with columns from your CSV file.
In principle, two cases are distinguished per asset to be imported:
- the asset already exists: In this case, there are no mandatory fields that need to be selected. Those fields for which you set a mapping will be updated by the import process. The rest remains untouched.
- the asset must be created from scratch:
In this case, there is a set of mandatory fields for which a mapping must exist.
This set includes the fields:
- Organizational Unit
- Location
- Product
- System Type
- Asset name
- Manufacturer
Within a process, new assets can be created as well as existing assets can be updated. In such a case, it is still necessary to specify a mapping for the mandatory fields.
Please note: How to import cost information is separately explained in section Import cost information.
After you have entered all desired mappings, click on the "Continue" button.
A dialog opens and you have the possibility to decide if you want to store keys for your assets.
Storing keys is essential to be able to find your newly created assets later on.
If you have the possibility to specify one or more keys for your systems (serial number, IDs from external systems etc.),
use them and select the option "Yes, assign keys", otherwise select "No, do not assign keys".
Caution: If you do not have keys in your CSV file or do not assign these keys,
you will not be able to update existing assets via the import function, only create new ones.
All entries in your CSV file will be used to create new assets in the CIO Cockpit in this case.
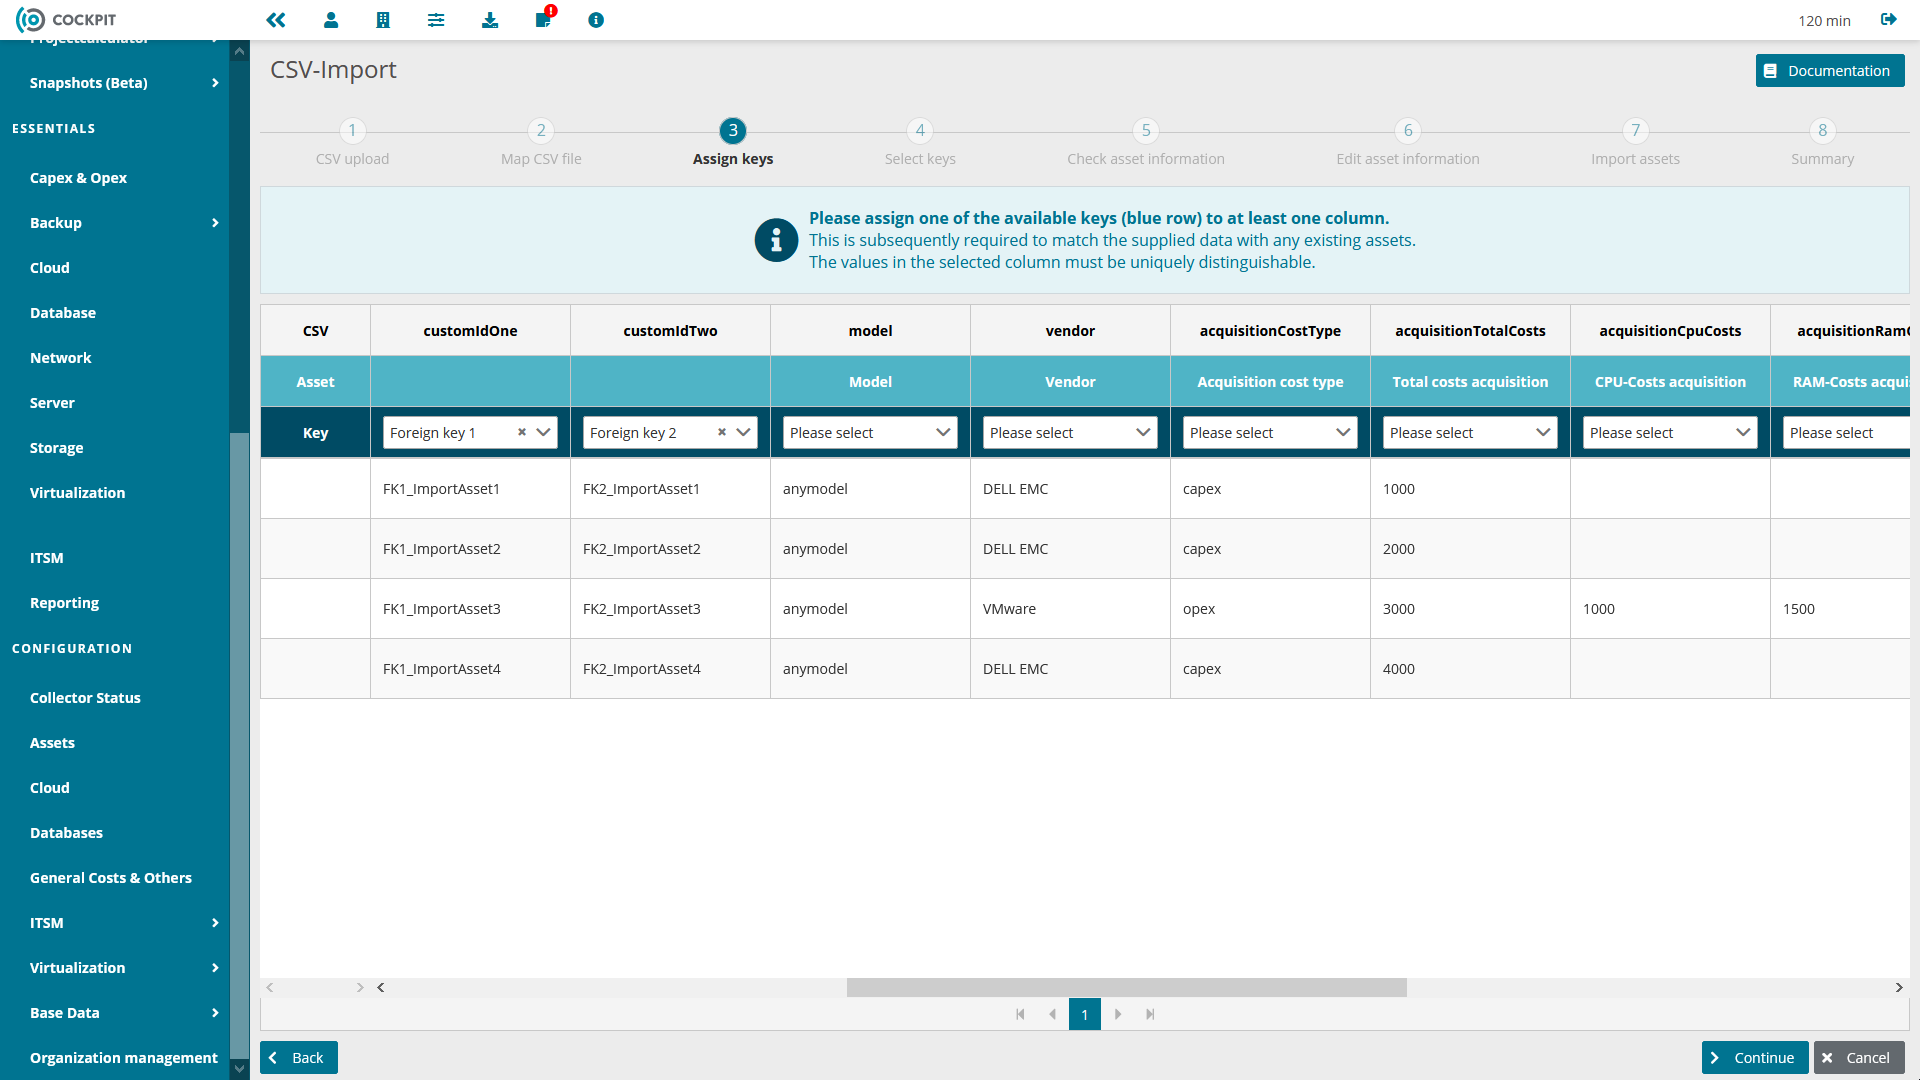
Step 3: Assign a key (optional)
If you selected the "Yes, assign key" option in the previous step, this assignment will be performed in the third step.
Otherwise, you will be taken directly to the fifth step.
Assigning keys works in the same way as creating mappings in the previous step.
In addition to the CSV columns and the asset fields already selected before, you will now see a new selection option for the keys available for selection.
For each CSV column, you have the option to specify that the column serves as the source for one of the keys "Cockpit ID", "Foreign Key 1", or "Foreign Key 2".
As in the last step, the selected entries again each correspond to an asset field.
Each entry you make will cause the contents of the corresponding CSV column to be taken as the contents of the selected asset key field.
The two keys "Foreign Key 1" and "Foreign Key 2" are text-based key fields that you can use freely, with no meaning given by the software.
The Cockpit ID is a unique identification number within the CIO Cockpit that is automatically assigned for each asset.
The cockpit ID, unlike the two foreign keys, is immutable and cannot be removed.
When making a key assignment for the cockpit ID, you must ensure that all cockpit IDs used already exist in your CSV import file.
You can ensure this, for example, by using an asset export as the starting point for the import, since it will always contain the correct cockpit ID.
New assets to be created may show an empty value in the corresponding CSV column.
Caution: The key values used must be unique for all assets in a customer environment.
I.e. you cannot, for example, create two different assets with the same value in the "Foreign Key 1" column in your environment.
The requirement for the uniqueness of the key values applies only within the respective key,
i.e. you cannot select the same value for the "Foreign key 1" column twice,
but you can use the same value once each for the columns "Foreign key 1" and "Foreign key 2".
Now select at least one combination of CSV column and key and then click on the "Continue" button
Step 4: Select key (optional)
In the previous step, you selected at least one key that will be transferred to your assets.
In this step, you will now select the one key,
that identifies existing assets in the system with the assets you supplied via the CSV file.
If a row in your CSV file is identified with an existing asset during import, no new system is created, but the existing asset is updated.
In the top pane, all the keys you assigned in the last step are available for selection.
To continue, select the key that will be used to identify existing systems and click the "Continue" button.
Your entries will now be transferred to the CIO Cockpit and checked by the system for correctness and consistency.
This process may take a few seconds.
If the validation could be passed successfully without errors, you will be forwarded directly to step 7.
Otherwise, the software will automatically redirect you to step 5 and you will need to make a correction before importing your data.

Step 5 & 6: Check / edit asset information.
In the "Check asset information" step, you will get information about the errors in your input, that prevent your data from being imported correctly.
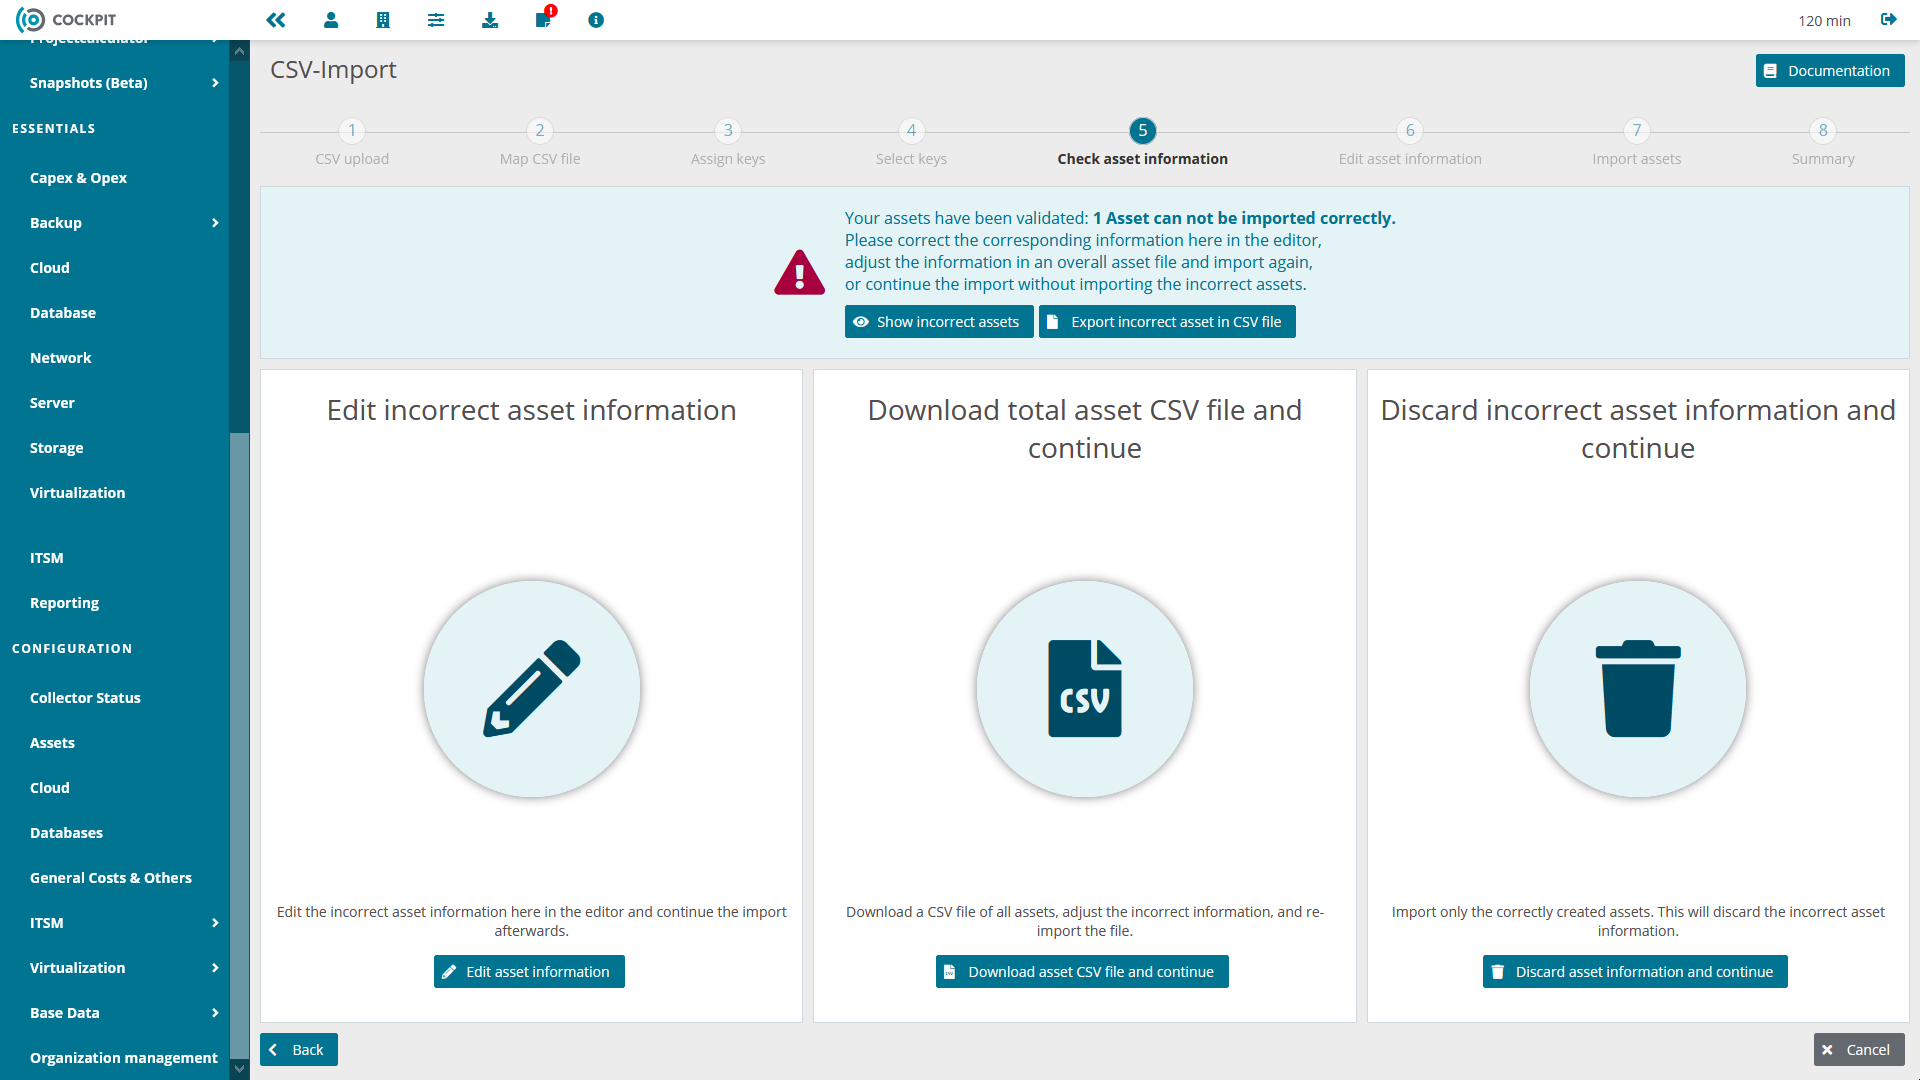
The top button "Show Erroneous Assets" allows you to open a dialog view that lists those assets in your CSV file, that contain errors and therefore cannot be imported. Cell-based errors that refer to a specific column of an entry are marked directly in the cell in question. Row-based errors that do not refer to a specific column can be found via the special "Errors" column.
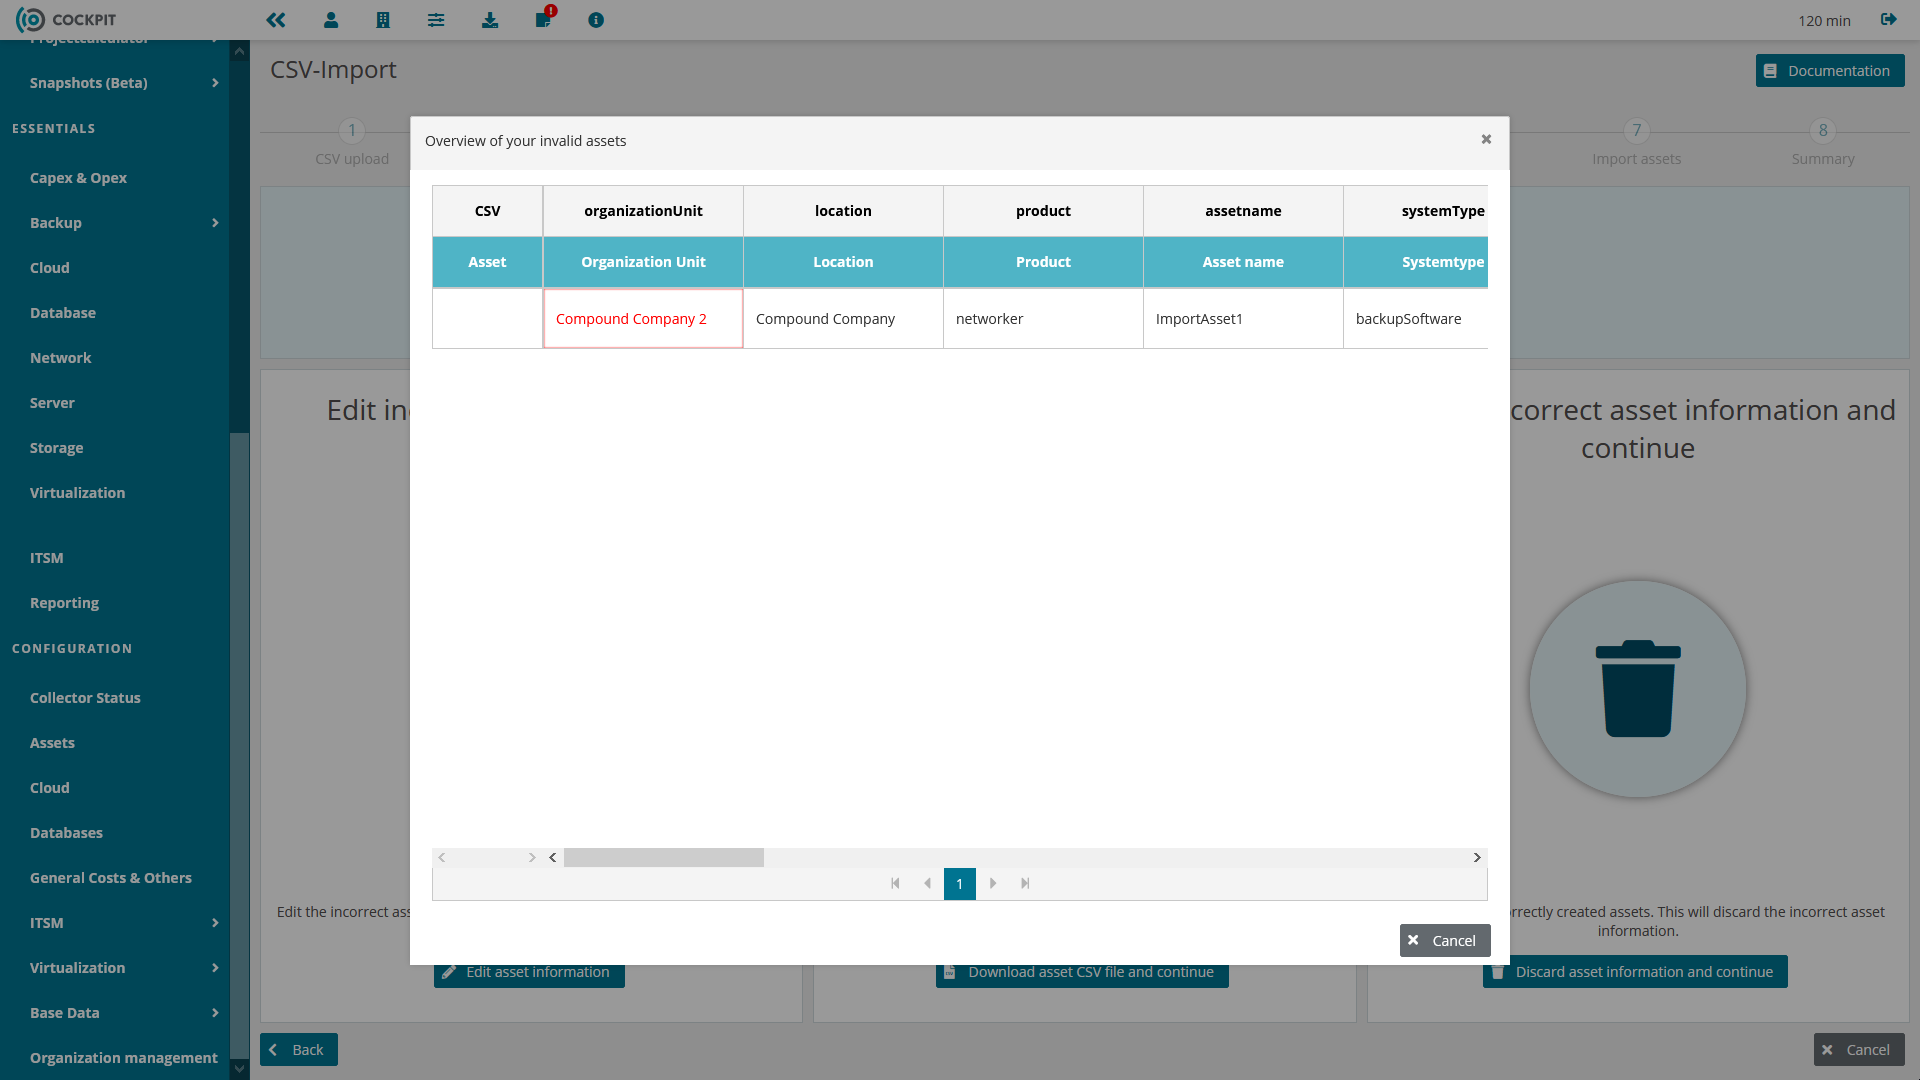
By clicking the "Export invalid assets as CSV file" button, you will get a snippet of the uploaded CSV file for download, which includes only the lines,
in which errors were found during validation.
You now have three options to continue the import process:
- you can use the interactive editing mode to correct the incorrect entries directly in the software.
To do so, click on the left button "Edit asset information".
A new table view will open containing only the erroneous rows.
You can edit the cells identified as erroneous directly in the table
or use the button in the "Sidebar" column to open a form view at the side of the screen and correct the errors there.
Click the "Check Input" button above the table to revalidate the entries you have corrected. If you have corrected only some of the errors, the table will reduce to the rows that still have errors and you can continue with the correction. After you have corrected all the errors, you will automatically be taken to step 7.
Alternatively, before correcting all errors, you can use the "Back" button to return to the last view. Your previously entered and reviewed corrections will be retained.

- if you do not want to do any interactive editing of your erroneous data,
you can alternatively click on the middle button "Download Asset-CSV-File and proceed"
to download an annotated copy of your input data.
The downloaded file contains the same data as your original import file, but has been augmented by the system with information about the erroneous cells. Erroneous cells are marked using the following syntax:##ERROR##<error description>
You can correct this file with a text editing tool of your choice (Excel, Notepad, etc.). Please note that you are only allowed to modify cell contents, otherwise the import will fail It is not allowed to change the number or naming of columns, add or remove rows.
When downloading the CSV file, you will be automatically redirected to a selection area, through which you can now deploy the corrected CSV file again. Deploying the corrected file works the same way as for starting the import process. Select the corrected file and click the "Continue" button. A new validation will be performed and depending on the result you will either be redirected to step 5 again to correct further errors if necessary or, if all errors have been corrected, to step 7. - if you do not want to correct your data, you can select the right button "Discard asset information and continue". If you select this option, only the error-free assets will be imported / updated and the remaining rows of the CSV file you provided will be ignored. Clicking this button will take you directly to Step 7.
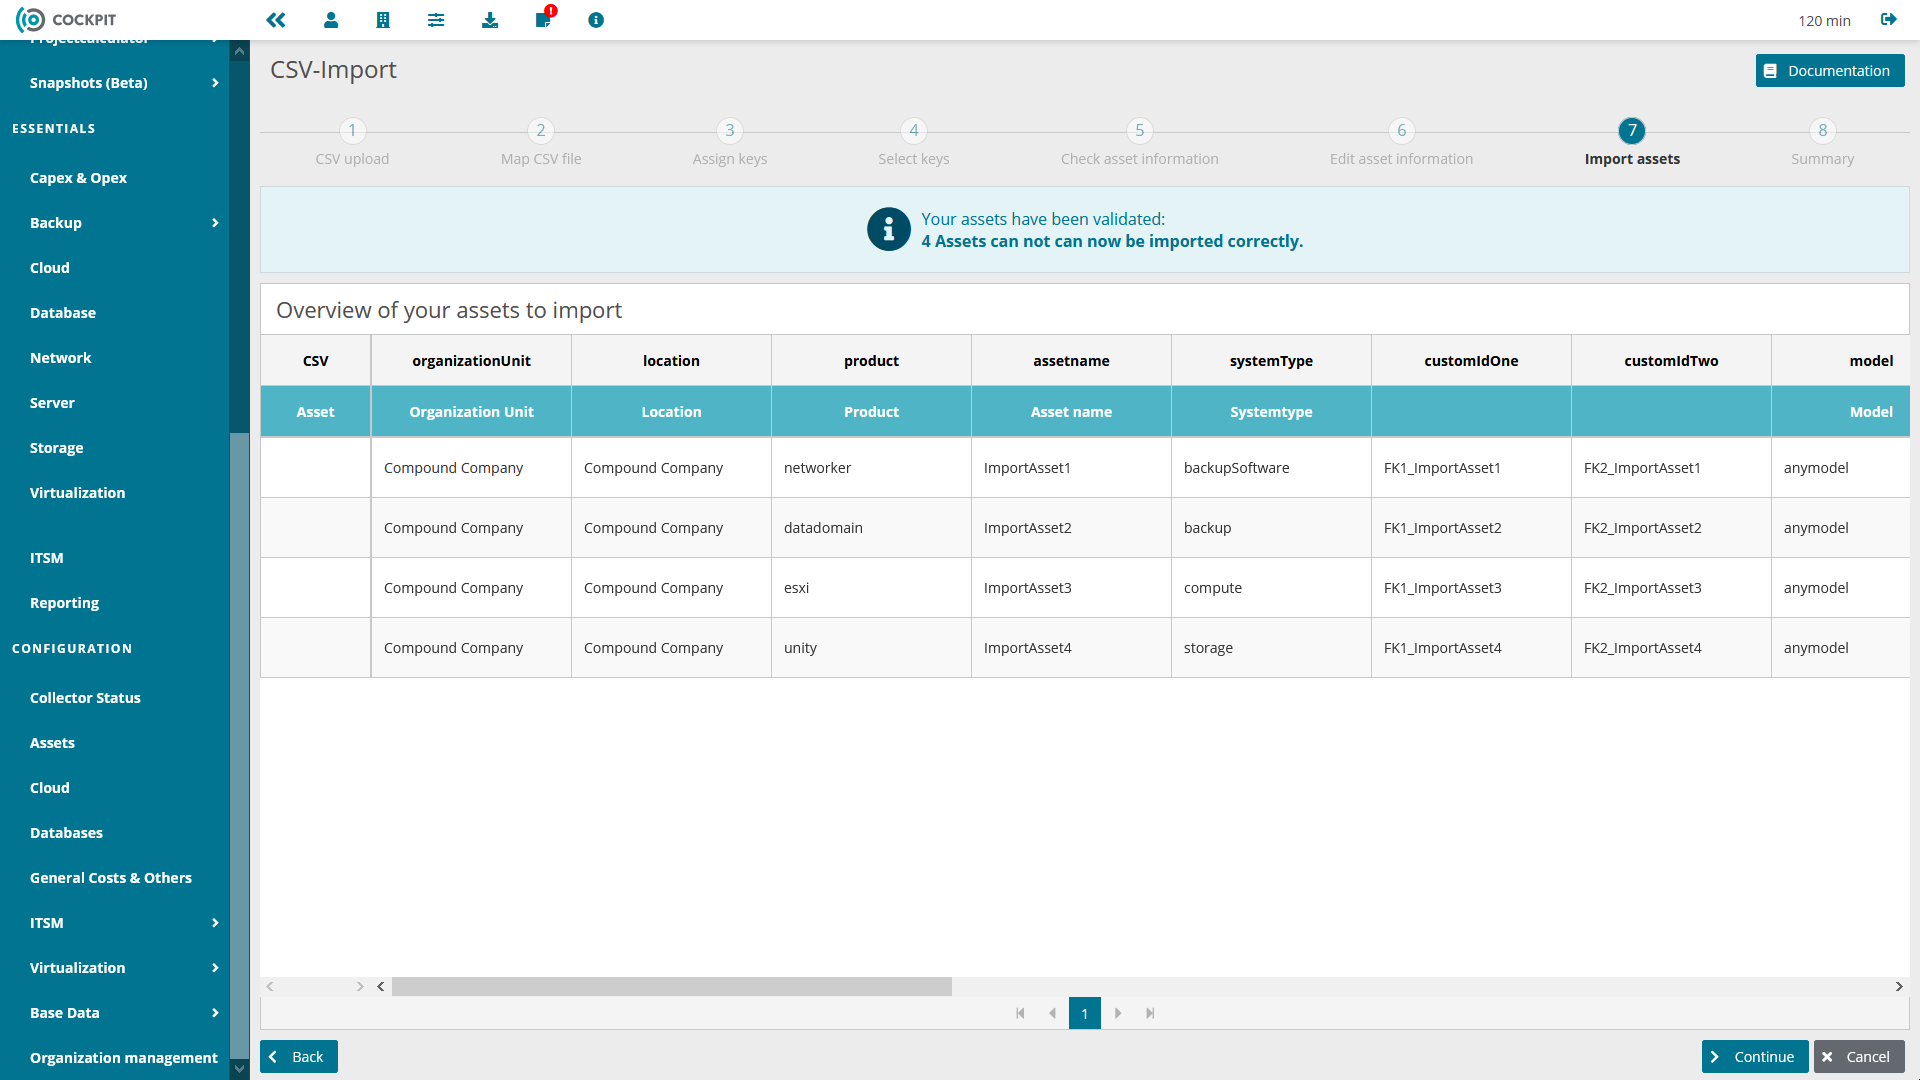
Step 7: Import assets
In step 7 of the import process, you will see an overview of the assets from your (possibly corrected) CSV file including mappings to the selected asset fields. By clicking on the "Continue" button, you will start the import process.
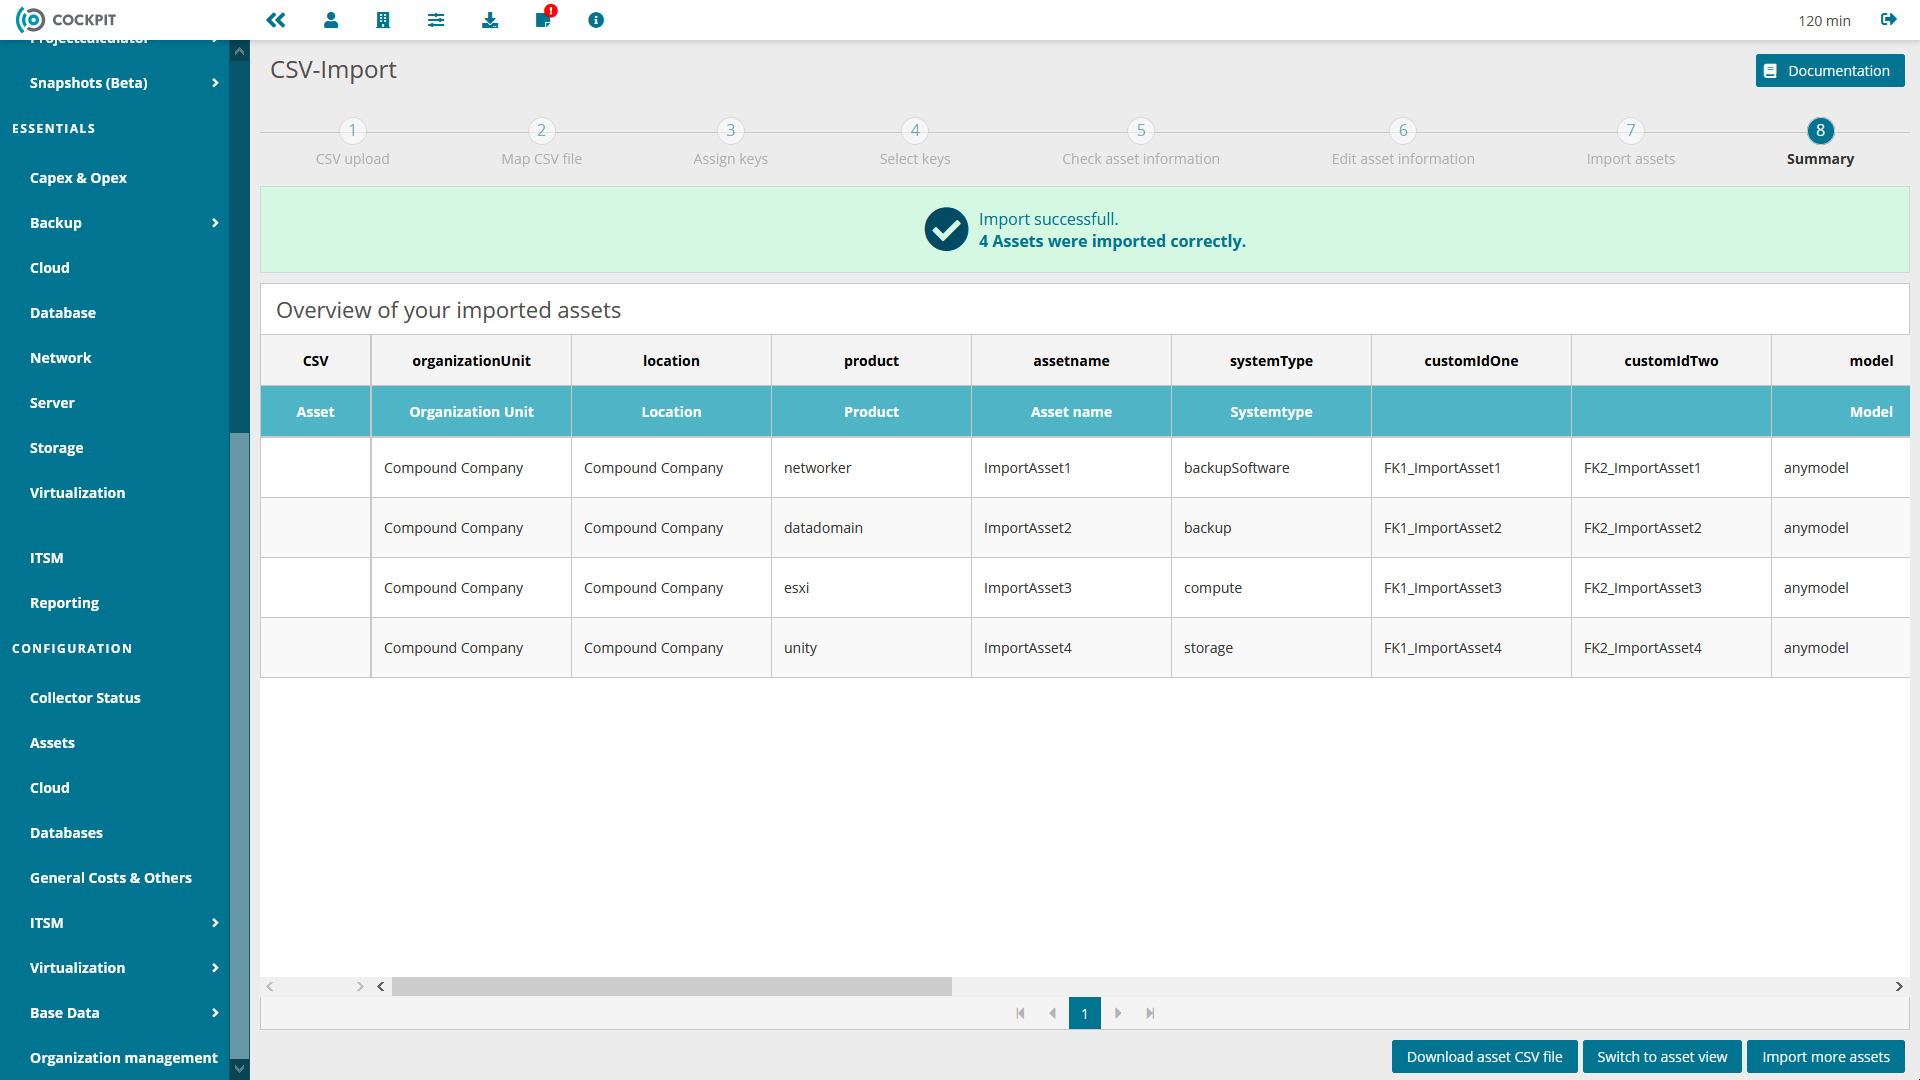
Step 8: Summary
The last step of the process serves as a confirmation of the successfully completed import. You will again see the list of now successfully imported systems and a success message in the upper area. If any unexpected errors occurred, they will also be listed in the upper area. You now have the option to download and save the successfully imported CSV file via the "Download Asset CSV File" button. Via a click on the button "Switch to Asset View" you will be redirected to the configuration area - Assets section, while the "Import more assets" button will take you to the starting point of the import process.
Import cost information
You can import an arbitrary number of cost positions per asset using the asset import function.
The table shown in section Importable Asset Fields lists all fields that can be imported per cost position.
In order to import multiple cost positions for a single asset, add all cost related fields once per cost position to be added to the import file and number them according to the following scheme:
<Column name>-Current_number
Assign a new Current_number to each cost position you would like to import.
If you would like to update an existing cost position, you need to reference it by its particular Cockpit ID.
Use the import field assetCostId-Current_number and insert the ID of the cost position to be updated.
You can find the ID by opening the asset creation form and searching for the cost position within the table of existing cost positions.
The remaining cost related columns, addressed by Current_number, can be used to update the according values.
In order to delete a specific cost position, use as well the field assetCostId-Current_number with the cost positions Cockpit ID
and insert the value #NULL# into the field assetCostTotalCosts-Current_number.
Export assets from CIO Cockpit
You can export your assets from the system using the CSV export interface.
The Step 1: CSV upload section explains how you can generate a full export within the import function.
Additionally, you have the option to request an export outside of the import process.
To do this, click on the "CSV export" button in the configuration area - "Assets" section.
Without further configuration, this will result in an export of all assets entered in the CIO Cockpit.
The process may take a few seconds, depending on the total number of systems stored.
Once the export is complete, the result will be made available to you in the form of a CSV file for download via the browser.
The exported CSV file is compatible with the asset import function and can therefore be used to update the existing assets.
To do this, simply modify the entries in the file that belong to the assets you want to update
and then use the result as input in the asset import function as described above using the cockpit ID as key.
Using the filter options in the table, you also have the possibility to filter the assets to be exported according to certain criteria.
All filters that you have set in the table before starting the export will also affect the generated export.
Importable asset fields
The following table contains all the currently importable asset fields:
| Asset field | Field type | Default column name | Description |
|---|---|---|---|
| OU | Mandatory field for new assets | organizationUnit | The organizational unit (cockpit object) of your asset, specified with exact name, mandatory for newly created assets, optional for existing assets |
| Location | Optional field | location | The location (cockpit object) of your asset, specified with exact name, optional |
| Product | Mandatory field for new assets | product | The product of your asset, e.g. datadomain, mandatory for new assets, optional for existing assets. Must be used in conjunction with the field vendor |
| Name | Mandatory field for new assets | assetname | The name of your asset, mandatory for new assets to be created, optional for existing assets |
| Alias | Optional field | alias | An alternative label for your Asset, optional |
| System type | Mandatory field for new assets | systemType | The type of your asset, mandatory for new assets to be created, optional for existing assets |
| External key 1 | Optional key field for assets | customIdOne | An external key that can be used to identify the asset to a third party system (SAP / FiBu etc.). This field cannot be imported but is used to identify and update an existing system. A usually suitable key is e.g. the serial number, optional |
| External key 2 | Optional key field for assets | customIdTwo | A second external key that can also be used to identify the asset to a third party system (SAP / FiBu etc.). This field cannot be imported but is used to identify and update an existing system, optional |
| Model | Optional field | model | The model of your asset |
| Vendor | Mandatory field for new assets | vendor | The vendor (cockpit object) of your asset, specified with exact name, mandatory for new assets to be created, optional for existing assets. Must be used in conjunction with the field product |
| Version | Optional field | version | The version (e.g. of the operating system) of your asset, optional |
| Cockpit ID | Optional key field for assets | cockpitId | The Cockpit ID of the asset. This field cannot be imported but is used to identify and update an existing system, optional |
| Serial number | Optional field | serialNumber | The serial number of your asset, optional |
| Comment | Optional field | comment | A comment on your asset, optional |
| Supplier | Optional field | supplier | The supplier (cockpit object) of your asset, specified with exact name, optional |
| Customer | Optional field | customer | The customer (cockpit object) of your asset, specified with exact name, optional |
| Tags | Optional field | tags | A list of tags for your asset, separated by comma, optional |
| Custom type | Optional field | customType | A custom type for your asset, optional |
| Partner | Optional field | partner | The partner (cockpit object) of your asset, specified with exact name, optional |
| Service partner | Optional field | servicePartner | The service partner (cockpit object) of your asset, specified with exact name, optional |
| Distributor | Optional field | distributor | The distributor (cockpit object) of your asset, specified with exact name, optional |
| Partner may see | Optional field | partnerCanSee | Setting whether the registered partner of your asset may read the registered information from his access to the software, optional |
| Service partner may see | Optional field | servicePartnerCanSee | Setting whether the registered service partner of your asset may read the registered information from his access to the software, optional |
| Distributor may see | Optional field | distributorCanSee | Setting whether the registered distributor of your asset may read the registered information from his access to the software, optional |
| Asset costs ID-1 | Optional key field for cost positions | assetCostId-1 | The Cockpit ID of the cost position nr. 1. This field cannot be imported but is used to identify and update an existing cost position of an existing asset |
| Asset costs type-1 | Mandatory field for new cost positions | assetCostType-1 | The type (acquisition, service, setup) of the cost position nr. 1, mandatory for newly created cost positions, optional for existing cost positions |
| Asset costs cost-pool-1 | Optional field | assetCostCostPool-1 | The (TBM) cost-pool of the cost position nr. 1, e.g. Software, optional |
| Asset costs investment type-1 | Mandatory field for new cost positions | assetCostInvestmentType-1 | The investment type (CAPEX oder OPEX) of the cost position nr. 1, mandatory for newly created cost positions, optional for existing cost positions |
| Asset costs start-1 | Mandatory field for new cost positions | assetCostStartDate-1 | The start date of the cost position nr. 1 (in case of acquisition costs this might be the depreciation start date), e.g. 2021-01-01, mandatory for newly created cost positions, optional for existing cost positions |
| Asset costs end-1 | Mandatory field for new cost positions | assetCostEndDate-1 | The end date of the cost position nr. 1 (in case of acquisition costs this might be the depreciation end date), e.g. 2021-01-01, mandatory for newly created cost positions, optional for existing cost positions |
| Asset costs effective cost months override-1 | Optional field | assetCostEffectiveCostMonthsOverride-1 | An integer number of months this cost position should be distributed over. Specifying this value will override the internal logic of evaluating the effectiv cost month range based on start and end date, e.g. 3, optional |
| Asset total costs-1 | Mandatory field for new cost positions | assetCostTotalCosts-1 | The total amount of the cost position nr. 1, e.g. 1000.0, mandatory for newly created cost positions, optional for existing cost positions |
| CPU costs-1 | Mandatory field for new cost positions for assets of type Compute Hardware | assetCostCpuCosts-1 | The amount of the cost position nr. 1 attributable to the assets CPUs, e.g. 500.0, mandatory for newly created cost positions, only for assets of type compute |
| RAM cost-1 | Mandatory field for new cost positions for assets of type Compute Hardware | assetCostRamCosts-1 | The amount of the cost position nr. 1 attributable to the assets RAM, e.g. 500.0, mandatory for newly created cost positions, only for assets of type compute |
| SSD costs-1 | Mandatory field for new cost positions for assets of type Storage Hardware | assetCostSsdCosts-1 | The amount of the cost position nr. 1 attributable to the assets SSD type storage, e.g. 500.0, mandatory for newly created cost positions, only for assets of type storage |
| NL-SAS costs-1 | Mandatory field for new cost positions for assets of type Storage Hardware | assetCostNlSasCosts-1 | The amount of the cost position nr. 1 attributable to the assets NL-SAS type storage, e.g. 500.0, mandatory for newly created cost positions, only for assets of type storage |
| SAS costs-1 | Mandatory field for new cost positions for assets of type Storage Hardware | assetCostSasCosts-1 | The amount of the cost position nr. 1 attributable to the assets SAS type storage, e.g. 500.0, mandatory for newly created cost positions, only for assets of type storage |
| Asset costs comment-1 | Optional field | assetCostComment-1 | A comment on asset cost position nr. 1, optional |
| Lifecycle Type | Optional field | lifecycleType | The type of lifecycle for this asset (NO_NEED_FOR_ACTION, RENEWAL, REPLACEMENT, CLARIFICATION), optional |
| Lifecycle Status | Optional field | lifecycleStatus | The status of the lifecycle (ACTIVE, INACTIVE), optional |
| Lifecycle Process Status | Optional field | lifecycleProcessStatus | The status of the lifecycle process (NOT_STARTED, STARTED, APPROVED, REJECTED, COMPLETED), optional |
| IT-/Asset manager | Optional field | responsibleContact | The email address of the contact/manager for this asset , optional |
| Contract date of asset | Optional field | contractDate | The date of the contract for this asset, optional |
| Invoice Number of contract | Optional field | invoiceNumber | The invoice number of the contract for this asset, optional |
| Order Number of contract | Optional field | orderNumber | The order number of the contract for this asset, optional |
| Service-Level-Agreement of contract | Optional field | sla | The service-level-agreement of the contract for this asset, optional |
Please note: The importable fields for cost positions listed here are shown as an example for a cost position with a Current_number 1.
You can import an arbitrary amount of cost positions by extending the field list.
In order to do so, add the same cost related columns as shown in the table with higher Current_number values.
See: Import cost information
Each asset in the CIO Cockpit has a specific system type. The following table shows all the system types currently available for you to choose from:
| System type |
|---|
| backup |
| backupSoftware |
| clientCommunication |
| clientCompute |
| compute |
| externalService |
| license |
| managedService |
| network |
| networkSoftware |
| other |
| sanComponent |
| securityDevice |
| securitySoftware |
| storage |
| storageVirtualization |
| tapeLibrary |
| ups |
| wan |
As a user of the CIO Cockpit you have the possibility to create manufacturers and products individually for your environment.
In addition, there is an already entered set of vendors and products that is always available.
All available default value combinations for the fields "systemType", "product" and "vendor" can be found in the following table:
| System type | Vendor | Product |
|---|---|---|
| backup | DELL EMC | datadomain |
| backup | Quantum | DXi |
| backup | Rubrik | rubrikcdm |
| backup | Veritas | Netbackup Appliance |
| backupSoftware | DELL EMC | avamar |
| backupSoftware | DELL EMC | networker |
| backupSoftware | Rubrik | rubrikcdm |
| backupSoftware | Veeam | veeamBackup |
| backupSoftware | Veritas | netbackup |
| compute | Microsoft | windows |
| compute | VMware | esxi |
| license | Cisco Systems GmbH | other |
| license | DELL EMC | other |
| license | Microsoft | other |
| license | Philips Healthcare | other |
| license | VMware | other |
| network | Cisco Systems GmbH | Catalyst |
| network | Cisco Systems GmbH | Nexus |
| network | Cisco Systems GmbH | other |
| network | DELL EMC | other |
| storage | DELL EMC | Compellent |
| storage | DELL EMC | ECS |
| storage | DELL EMC | Isilon |
| storage | DELL EMC | powermax |
| storage | DELL EMC | unity |
| storage | DELL EMC | vmax |
| storage | DELL EMC | vnx |
| storage | DELL EMC | vnxe |
| storage | Hewlett Packard (HPE) | 3PAR |
| storage | Hewlett Packard (HPE) | MSA |
| storage | IBM | STORWIZE |
| storage | NetApp | E-Series |
| storage | NetApp | FAS-Series |
| storage | Pure Storage | purestorage-flasharray |
| storageVirtualization | DELL EMC | Compellent |
| storageVirtualization | DELL EMC | vplex |
| tapeLibrary | Quantum | Scalar Tape |
If you have any questions or suggestions, we welcome a call at +49 201 959750 or an email to our support at servicedesk@dextradata.com.